March 19, 2014

DIY - Yarn art

By Chelsea


Well what do ya know, dear friends; we're covered in snow again! Good grief, Charlie Brown! Will it never end?! I sure am looking forward to long days outside with the paintbrush again. On a positive note, we've been stretching our creativity inside and I tried a really cool, (and easy to make), piece of art that I'm excited about sharing today!


What you'll need:
-1/2" pdf board, (the piece I used was a scrap piece from a sheet I had cut at Home Depot. The whole sheet was $11.50 and this was the half I didn't need)
-nails and hammer
-yarn

Step 1:
-Stain your pdf board as dark as you'd like for a richer finish. When applying stain I prefer to use a lint free cloth, (aka ripped up T-shirts), rather than a brush. It helps me get a more authentic finish and into all the grooves. I dip the cloth into the stain and then wipe it on moving in all directions, finishing with a back and forth motion.

Before

After a coat of Minwax Golden Oak stain

Step 2:
-Once the stain is dry, trace your design onto the board with a pencil, (press lightly). I decided to do a heart but you could choose whatever shape you want.


Step 3:
-Using a hammer, gently tap the nails into the board following the trace of your design. Don't tap the nails in all the way; about half - 2/3 will do. I spaced my nails about an inch apart.


Step 4:
-When you have covered your whole design with the nails, it's time to string the yarn! Tie the end of your yarn to a corner of your design, then start stretching the yarn across your design, looping it around each nail. When you like how your design is covered, cut a few extra inches of yarn and tie a knot around a nail, (snip the 'tail').


Lovin' our new funky boho art!


I propped the new piece up on a shelf in our little entry 'nook', which is a shared space with our living room, dining room, and kitchen. And that train track has practically become a 6th member of our family. I can't remember what the room looks like without it!

Photo bomb! The very best kind. :) 
Love that boy, (even though he's gonna go and turn 3 on me next week)!

This piece of art was so easy to make but the finished product is rockin'! So, something good did come out of being snowed in again. Sweet Spring, where are you?

Thank you for stopping by!

~Chelsea

P.S. Local friends to Northern Virginia, the garage is caving in with refinished pieces ready for a new home. Please check my Available for Sale link for all current listings and let me know if anything interests you, (and please, please share with anyone you know who might be interested)! If price is an issue contact me anyways. I would like to be ready with more work space for new pieces when the weather warms up again, (hopefully soon?). Thanks, friends!

March 13, 2014

The quiet lion of a living room

By Chelsea


True story: I was planning to write about coffee tables today, their strength in a room, and feature two in particular which I just refinished this week. As I sat down to write this post, an article popped up from Apartment Therapy asking readers for advice pertaining to a homeowners question about how to clearly define her living room.

Norma, I hope you don't mind my sharing your living room photo, (it's been seen by thousands anyway)!
null

When I saw Norma's living room I had two immediate thoughts: 1) Norma clearly has awesome taste as she chose the same IKEA rug that we chose, (Lappljung Ruta), and 2) Coffee table!!!

This space is fantastic and already has a great mix of pieces! As I read comment after comment, (some folks suggesting expensive new purchases and getting rid of some of these amazing pieces!), I was puzzled that no one simply suggested a coffee table, (I couldn't help it, I did throw my two cents in, along with a little furniture shifting idea). But seriously, stick a coffee table over that rug and Norma's got herself a cozy, bona fide living room!

Coffee tables are sometimes underrated I think. When planning a living room usually the first thoughts are of the seating. Deciding between armchairs and a sofa, sofa and a loveseat, loveseat and armchairs, (decisions, decisions). I'm not disagreeing with this, but be sure to save a bit of the budget for a clutch coffee table. Clutch, as in strong enough in the style of your room to bring it all together. Coffee tables carry a big responsibility and receive little credit.

So, on that sad note, here are two gorgeous clutch coffee tables I just finished this week and are now available for sale, (pick-up, only - I'm located in Northern Virginia):

Duck Egg bamboo coffee table
My second bamboo piece in a month! I may be falling hard.. Piece has been painted in Duck Egg by Annie Sloan Chalk Paint and sealed in clear wax. The herringbone construction pattern to the bottom 'shelf' is incredible; a truly unique piece!
39.5"W x 19.5"D x 18.5"H
$175


Paris Grey antique coffee table by Lane, (circa 1950s)
This beauty is a real rescue - constructed of solid mahogany wood and still sturdy as can be, the original finish was damaged by a handful of water stains. I painted it in Paris Grey, (also by Annie Sloan Chalk Paint), and distressed all the unique edges and corners to maintain the character and age of the piece. Sealed for protection in clear wax. (Sorry the floor looks blood red!? My new camera and I are still getting acquainted. This is the true color of the table, however).
48"W x 22"D x 16"H
$195


If interested in either of these pieces please contact me at chelseasgarage@gmail.com!

Thank you so much for reading!

~Chelsea


March 12, 2014

Our basement: Bummer to Brilliant!

By Chelsea


Hi All! Over the last two years of documenting furniture transformations and home decorating projects on this blog, I have probably showed you our basement once or twice...maybe. It's just always been the 'leftovers' room. That space where unused decorating accents ended up. I'm all about an eclectic mix, but our basement was not the good kind. There was nothing tying any one thing to anything else. Somehow this space, where we spend most of our time together as a family, ended up the most neglected. And as a result it was bumming me out!

Here it is before we moved in:

And now - after just a bit of time and creativity!


My favorite little touch down here is most definitely the window frames. Seriously, my new gold metallic marker and I are really hitting it off together...I highly suggest purchasing one for yourself and seeing what happens next... Anyways, I wanted to maintain every ounce of light coming in through these small windows, (which we are really grateful to have considering it's a basement), so rather than dress the windows up in fabric, I drew in a herringbone pattern on their frames with my gold marker! 

It pays to be bold and try new things. You never know what you might discover!
(you are looking at my most geeked out photo yet. I did tone it down before publishing...)

There's the ottoman I showed you how to recover recently, (how to create your own pattern with a metallic marker is also on that tutorial)!

The clock above the TV and the dresser-turned-media center are both refinished pieces using the same green spray paint. The clock I took apart, sprayed the frame, colored in the numbers, (with guess who? Mr. Metallic Marker), put it back together, and hung it over the old stove pipe which is exposed in the before picture. For the media center I removed the drawers, took them outside, and applied this exact same technique, except with spray paint!


As I was working on this room a pretty simple thought occurred to me. For the basic kick-back and chill-out room, the number one rule is comfort first. Furniture absolutely must be comfortable and functional. After that, there are no rules!!! Play with colors and patterns that you might not use elsewhere in your home. Grab a bunch of pillows with bright and funky patterns; throw some on the couch and stack the rest on the floor! Pull in some humorous art that would look ridiculous in your dining room. Be a little bolder than you would anywhere else and have fun with it; It'll probably work! Be brave, little flower buds.

Thanks for stopping by!

~Chelsea

March 7, 2014

{Before & After} Hot out of the Garage and available for sale!

By Chelsea


Hi All! So happy to have at least one refinished piece to show you this week! Like so many of you, I am just itchin' for warmer days under the sun. It's been quite a long winter and I feel like Chelsea's Garage has been in a hibernation of sorts as far as furniture refinishing goes. Aside from the issues of frozen, crystallizing and crackling paint which have made refinishing chilly pieces a challenge, the majority of my attention has been called indoors with my babes. Coming up with new indoor activities to occupy my brood of energetic little ones has been a challenge I tell ya! But, Lord willing, soon are the days when we can all be outside together again, playing and painting.

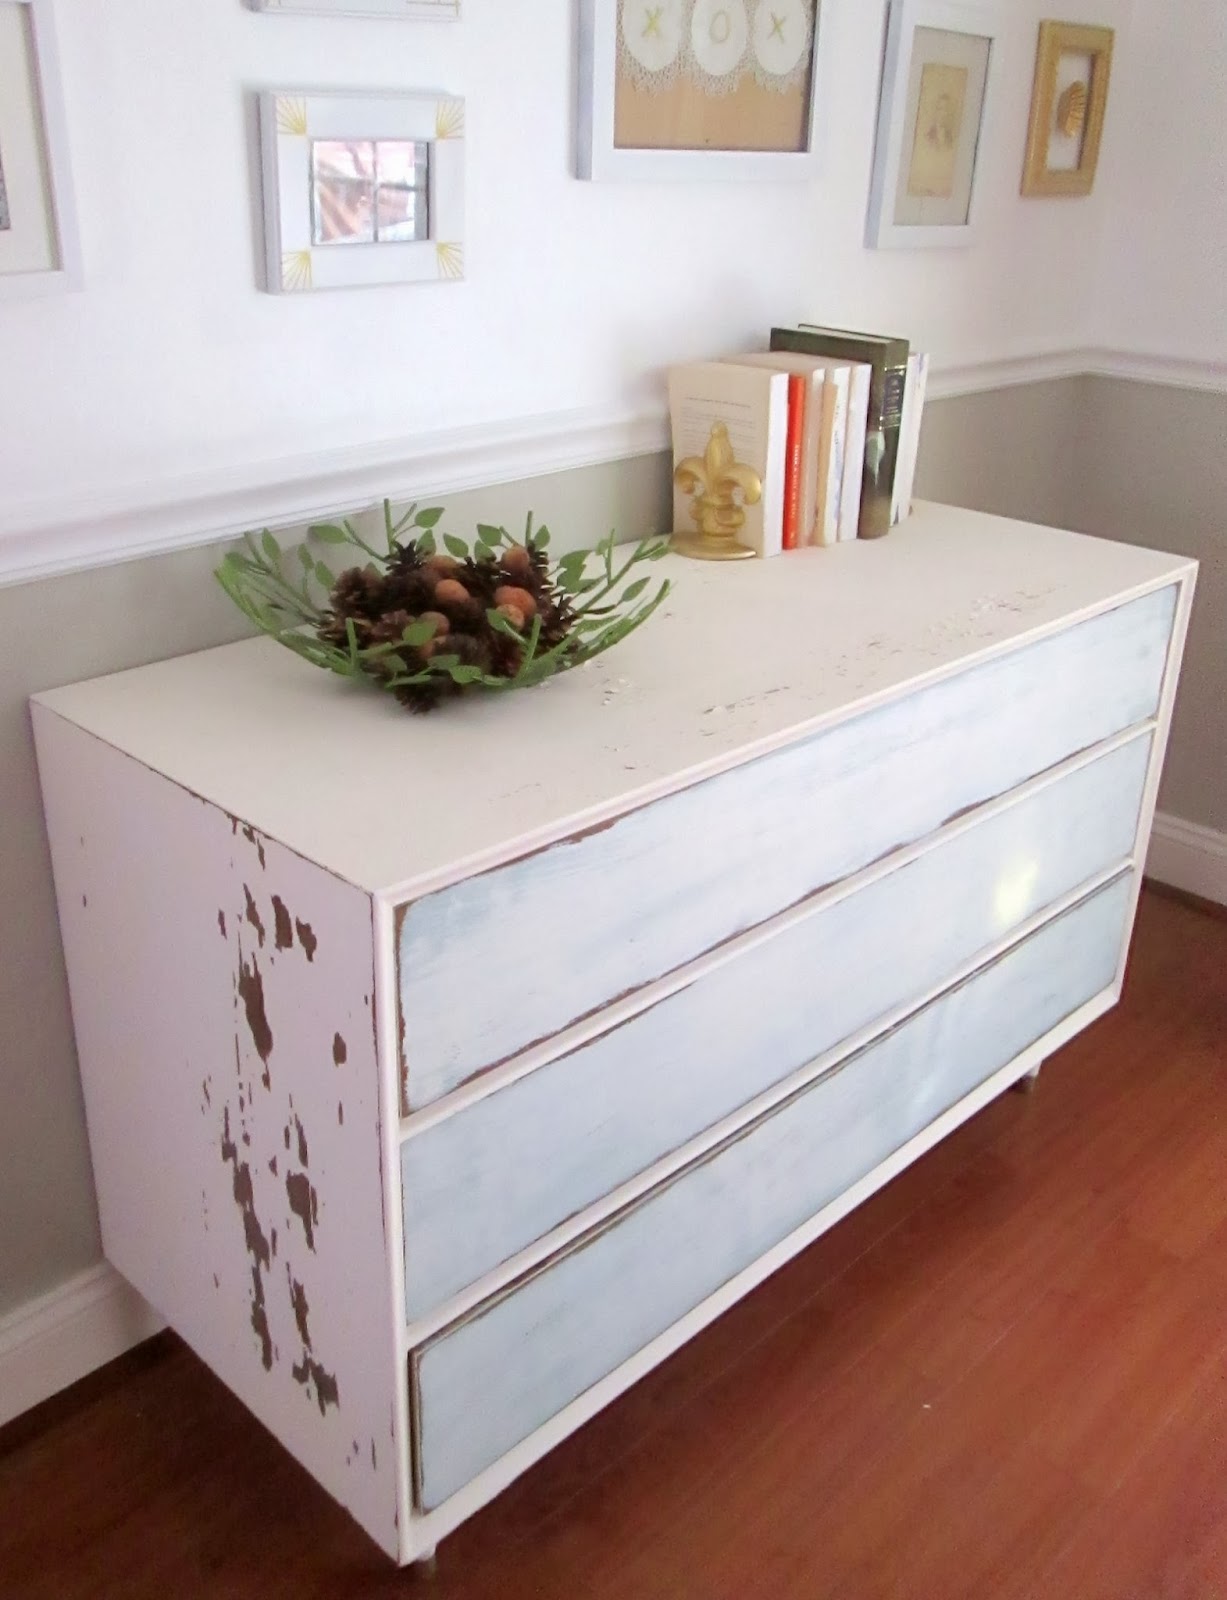
So the piece I've got today, (and now available for sale), is one of my new favorites. If you're relatively new to my blog you should know that I'm always looking for versatile pieces to refinish. I love those pieces which can float around a home, moving from dining room buffet to bedroom dresser to living room media center. Versatility is what I look for to use in my own home, so that's what I typically feel compelled to offer to others. When I find a beautiful piece that is multi-functional, I feel like I'm getting that much more bang for my buck. And who doesn't want that?!


I refinished this beauty in Old White by Annie Sloan chalk Paint, and then gave the three drawers, (which open easily by a lower lip), two solid coats of Duck Egg Blue, (also by ASCP). I finished the drawers with a thin. dry-brushed coat of Old White and distressed along the edges with a medium grit sanding sponge. With previous pieces that I've painted this winter I've fixed and smoothed out the crackling before sealing. This piece, however, just became all the more beautiful in my eyes with the crackling, so I decided to let it be. The piece has been sealed in Minwax Polyurethane clear semi-gloss, so the crackling won't continue and chip away onto the floor. 


I'm completely enamored with chippy pieces and love what's going on with the sides of this one. It's so charming!


Before

After

Piece now available for sale
48"L x 29.5"H x 19"D
$295

Thank you so much for reading and have a wonderful weekend!

~Chelsea

P.S. The video in the About section is fixed and up. Just a little sample of some of the fun we have when we're stuck inside, (okay, or even when we're not stuck inside).


March 6, 2014

Master bedroom Before & After

By Chelsea


Hi guys! I've been so excited to show you this room in our home for a while now. I started adding some color to our light and airy white bedroom a few months ago, and little by little, it's had a nice transformation! By a handful of DIY projects and a World Market gift card I got for Christmas, the room went from this...


To this:


The wall color, the duvet and a couple other pieces remain the same, but it's astounding how different the room feels with a few snaps of color here and there! So what exactly changed?
1) I painted our leaning wall shelves, (the thin, cheap, assemble-yourself kind we found on Amazon several years ago), in Chateau Grey by Annie Sloan Chalk Paint. Then I heavily distressed them for a charming aged feel.
2) I bought a 1/2" sheet of pdf board and had it cut at Home Depot to fit over our floating bedside tables. I stained them before fitting them on and am loving the touch of natural wood flanking the bed.
3) The pillow shams and curtains came from World Market, (thank you for the gift card, Casey)!
4) The decorative pillows are from Home Goods, (both were in under $10 clearance)
5) I spray painted a few small accents on the leaning wall shelves gold. Love the warmth of a few hits of gold around a room!
6) The homemade headboard, (tutorial here)
7) The lampshades! Our lamps came from Crate and Barrel as wedding gifts 7.5 years ago. I wanted to give them a slightly industrial feel, so I covered them in chicken wire.

Here they are before:

I measured and cut a length of chicken wire

Folded the top and bottom of the chicken wire over the edge of the shade

Love, love, love how this turned out! 


Thank you so much for coming by! Up tomorrow is a new piece available for sale. Production has been slow during this severe winter but it certainly hasn't stopped!

~Chelsea