Showing posts with label how to make a paper wreath. Show all posts

November 18, 2013

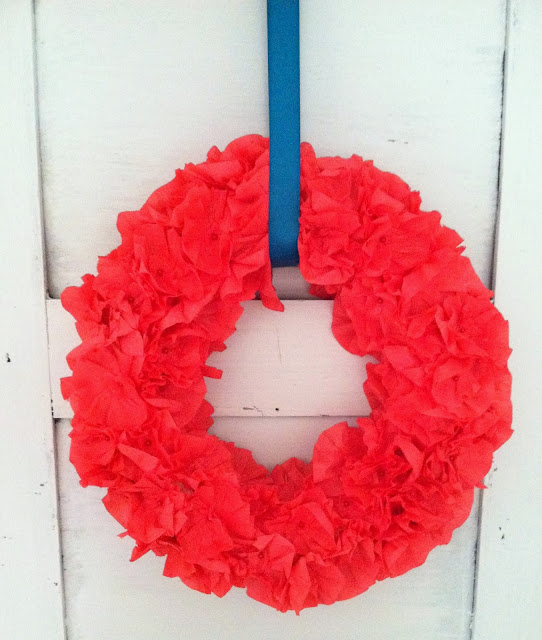
One A Week {Crepe flowers wreath}

By Chelsea


Hi guys! Last week for my One A Week series, I shared a tutorial on how to make this pom-pom wreath, (a knock off of Anthropologies Fluffed Wool Wreath). Today I've got another wreath - this one made from crepe paper!

-

Supplies:
-1 hay frame from Michaels, (keep it wrapped in plastic or you'll have a hay mess on your hands) $3.49
-1 pack of ball-tipped pins, (I bought a 100pk and used about half) $3 something
-1 roll of crepe paper from the dollar store $1

Step 1: Gather your crepe paper in little pleats until you've created a little 'flower', coming all the way around back to the beginning. Tear the crepe paper off and fold the flap to the middle
 Step 2: Stick a pin through the middle and pin it straight into the wreath frame

Now hang it however you'd like! I used a teal grosgrain ribbon.


This style would also be beautiful using white or cream crepe paper and gold ball-tipped pins!

Thank you for reading! And don't forget to email me pictures if you try any of these One A Week projects. I've already seen a few of your amazing pom-pom wreaths; well done and thanks for sharing!! At the end of the series I might just do a whole post of photos of your handiwork, so send em' in!

~Chelsea

October 1, 2013

Repost: Paper Wreath Tutorial!

Hi! Today I am re-posting one of my most frequently checked-out DIY tutorials - the bookpage wreath! I posted this tutorial last November but wanted to get it up a bit earlier this year. It's just such a beautiful wreath that is fun to leave up for a longer season. It doesn't scream 'holiday' but gives off an understated warmth and coziness of the holiday season. And if you try this or any other homemade wreath projects, please take some pictures along the way - in a month or so I'd love to share your beautiful creations here on Chelsea's Garage!

How to make a bookpage wreath

Supplies:
-2 books of slightly different colored pages for a bit of contrast in your wreath
-Stapler
-Craft glue
-Black paint & small brush
-13"-14" foam wreath frame


 Step 1:
Paint the outside of the pages of your books black. This will give each individual page of your wreath a little punch so you can see the contrast


Step 2:
Tear out pages one by one and shape into a cone. Staple the ends. I make the outer edge of cones on the wreath like this....


...then I make all the other 'layers' of cones in the wreath like this, with a double fold at the bottom of the cone.


Step 3:
Drag a strip of glue across the bottom of your cone


Step 4:
Stick the cone on your wreath frame, tucking in each cone one next to the other, working from the outside of your frame towards the inside. When you are starting a new 'layer', make sure you are tucking the cones in close to the previous layer so you don't have bare spots.


*As you work your way in, your cones will start facing the inside of the frame, as you can see in this picture. Once it looks like you can no longer see much green of the frame, do one final layer just as you have been doing, but face the cones outward. I tried to get a couple pics of what I'm talking about...look at the inside of this wreath - you can see how the very inside cones are facing out, and the layer of cones above them are facing in.


 Your beautiful final product!


 The photo above is a year old and that wreath was given to a friend. The photo below is a recent shot of the wreath I made almost 3 years ago; I love how it has aged to a deeper color over the past few years, (I leave it up year-round)!

This is one of my favorite DIY projects. I got my books at a thrift store for pennies a piece, the black paint and glue I already had here at home, (but you can purchase them at Michaels for just a few bucks), and the wreath frame was around $10 at JoAnns Fabrics, (they are a few bucks more at Michaels, around $13, I think). So it's a very inexpensive project that looks worth much, much more.

Thank you for stopping by!

~Chelsea

October 31, 2012

Paper wreath tutorial

Hi friends! What an interesting last few days we have had at our house! Starting last Wednesday night every person in my family, (myself included), caught some sort of bug/flu over the following 5 days. Yuck! Then, overlapping the flu, we were hit with hurricane Sandy! We are very fortunate to have absolutely zero effects from the storm on our home or property. Every time I flip on a light, take a shower, feel the warmth of the heat, or simply zap something in the microwave, I am so grateful that the Lord protected us. There are many who have suffered/are suffering from this great storm and my thoughts and prayers go out to them.

While we have been counting our many blessings, we have also been looking for things to pass the time inside as we haven't left the house in 5 days! The kids have reaped the benefits of my cabin fever as I have bent some rules just to keep things interesting. I piled our main floor furniture against the walls and on top of the dining table and brought their bikes inside so they could race around like a mini biker gang. We've taken apart our basement sectional to make a massive fort! I took real food down to the kids play kitchen that they got for their birthday so they could pretend they were actually cooking and serving, (a mess that I fully anticipated, enjoyed in the moment, and hated cleaning up). Yes, the kids have been busy and quite enjoying themselves!

To relieve my own cabin fever, I decided to make a paper wreath during the kids' nap time yesterday!

This wreath will be donated for a silent auction that will benefit a fantastic cause supporting education for underprivileged kids in Washington D.C., (please see info here - totally worth a few seconds to check out). It's the second wreath I've made like this but the first time I've photographed the process so you can try it yourselves!

Supplies:
-2 books of slightly different colored pages for a bit of contrast in your wreath
-Stapler
-Craft glue
-Black paint & small brush
-13"-14" foam wreath frame


Step 1:
Paint the outside of the pages of your books black. This will give each individual page of your wreath a little punch so you can see the contrast
 
Step 2:
Tear out pages one by one and shape into a cone. Staple the ends. I make the outer edge of cones on the wreath like this....
 
...then I make all the other 'layers' of cones in the wreath like this, with a double fold at the bottom of the cone.
 
Step 3:
Drag a strip of glue across the bottom of your cone
 
Step 4:
Stick the cone on your wreath frame, tucking in each cone one next to the other, working from the outside of your frame towards the inside. When you are starting a new 'layer', make sure you are tucking the cones in close to the previous layer so you don't have bare spots.
 
*As you work your way in, your cones will start facing the inside of the frame, as you can see in this picture. Once it looks like you can no longer see much green of the frame, do one final layer just as you have been doing, but face the cones outward. I tried to get a couple pics of what I'm talking about...look at the inside of this wreath - you can see how the very inside cones are facing out, and the layer of cones above them are facing in.

 
Your beautiful final product!

 
This is one of my absolutely favorite DIY projects. I got my books at a thrift store for pennies a piece, the black paint and glue I already had here at home, (but you can purchase them at Michaels for just a few bucks), and the wreath frame was around $10 at JoAnns Fabrics, (they are a few bucks more at Michaels, around $13, I think). So it's a very inexpensive project that looks like a million bucks when it's finished! Well, maybe not a million...but definitely classy and elegant, (in my opinion).
 
Have you done any fun projects from home recently? Or seen any cool ones you'd like to try?
 
~Chelsea