August 21, 2014

Change is in the air

By Chelsea


Hello dear friends, I'm writing today with a full and grateful heart. All of you even keel, non-feelers out there, be warned; it's about to get real!

Chelsea's Garage began on a wing and a prayer during the fall of 2009. I was spending long days living in Fairfax County Hospital while on monitored bed rest pregnant with our twins. During my time there I began researching how to refinish furniture, (among my other daily activities of crocheting, walking to the bathroom, and watching Ellen at 3). I saved a file full of the supplies I'd need, tools, and techniques; I really learned quite a lot before I ever picked up a paint brush. While the little babies played wrestle mania in my tummy, a little dream was stirring around in my mind.

The dream was tucked in my back pocket and stuffed with soiled spit up cloths and pacis while we survived our first year with twins in our apartment at the time. The funny thing is, I never felt anxious to get started. The Lord really gave me so much patience in waiting until the time was right. It's not in my nature to wait well and with a good attitude, so I am so grateful for that gift of patience during that time. God asked me to wait again when He surprised Matt and me with our third child, Mason, who was born right before the twins were 17 months. Before Mason's birth we had settled into our first home with not much more than our kids to our name.

It was after Mason was born that I jumped into the furniture refinishing / blogging world. I didn't know anything!!! I barely knew who I was as an artist, a designer, and much less, a creative business owner. But what I had without question was passion for inspiration and creativity. Over the last few years of publishing posts, (today's is the 400th!), on creative DIYs, refinished furniture pieces, and home decor ideas, I have learned more than I could ever have imagined, and the passion has only grown stronger.

About a year ago, Cate, (my talented sister-in-law who has been guest posting every Wednesday), and I started talking about building a business together. We've collaborated ideas, discussed goals and mission, and have a very clear direction with which we would like to move forward. Our aim is simple: to provide a top-notch resource site that is chalk full of information and inspiration for all styles. We want to provide not only imaginative DIY ideas, but where-to-find lists, how-to-make tutorials, and share more of what other creatives out there are doing as well! We want to offer a one-stop source that promotes sharing information and tips, tricks and techniques, and supports a positive, encouraging community among it's readers.

Although the content will be similar to what you've seen on Chelsea's Garage, (we will both continue refinishing furniture, flipping great deals, and sharing imaginative ideas), I've decided after much prayer and thought, that it's time to move forward with something completely fresh and retire Chelsea's Garage.

We are so very excited about this adventure but we know it will be a lonely ride without you all. We hope you will take this leap with us as we become something new; as we transition to 
STYLE MUTT

Naming our new site Style Mutt came very naturally; we both feel that our own personal styles are an eclectic mix of this and that, and I endearingly likened this mix of styles to a style mutt over a year ago here on Chelsea's Garage! Our hope is to build a resource that is helpful, informative, and inspiring to all breeds of style.

We are working hard on creating a clear sense of Style Mutt's mission, and building the site ourselves, so we will likely be taking most of September off so our focus can be clear. This does not mean Chelsea's Garage will cease to exist by October. We don't know exactly how long the site will take us to build, and we will still be posting to Chelsea's Garage, (except for September), until Style Mutt is completely ready. During this time of transition we hope to continue working on refinishing furniture and are still accepting custom orders, so don't hesitate to contact us if you have something in mind! We'll be sure to keep you posted on all that is happening with Style Mutt and hope as this new beginning approaches, you'll be as excited about it as we are! 

Thank you so much for hanging with Chelsea's Garage all this time - your 'company' here has meant so much to me and I could never have imagined the countless blessings that would befall over me through this blog. I feel so much peace about closing this door as I completely trust that the new door opening is so incredibly worth it. And I know you'll all be right there when this new door opens. You have to be; we need you!

Thank you, as always, for stopping by!

~Chelsea

P.S. You guys rock.

August 18, 2014

DIY - Rustic Rope Footstool

By Chelsea


Hi friends! I'm back with another DIY project today that I really enjoyed seeing come together. There are many reasons to take a project on yourself versus buy new or hire someone to do for you. Sometimes budget is the driving force to DIY, sometimes it's an itch for creativity, and sometimes it's simply seeing something inspiring and wanting to make it your own. Inspiration was the reason behind today's project!

Long story short, I noticed a particular footstool at my parents' beautiful home while visiting for dinner the other week with my family. It's quite a simple stool, but the rustic effect it had in their living room really caught my eye. I love seeing natural elements mixed into home decor, and this particular footstool is such a perfect example of something small that creates that natural bit of warmth.

I couldn't help but snap a photo:

And after a little fun, here's mine:


Want to see what it started as?


Not a bad deal, eh?! Let me show you how!

Supplies needed: 
Stool, preferably unpainted
Rope
Hot glue gun
Electric saw, (I used a circular saw)
Sandpaper, (120 grit)
Stain, (I used Ash)
White paint
(To note: I only included the price of the stool, $5, and the price of the rope, $8, in the overall cost of this project, since the rest of the supplies are either common household items, (hot glue gun, sandpaper), optional, (stain and white paint), or easy to borrow, (the saw).

The Low-down

1. Measure each leg accurately, (I used 9" from the seat), and mark where you want to make your cuts, then cut. Be sure to sand the legs at the cuts so they're smooth. 120 grit sandpaper would be ideal.


 At this point, because my legs were painted, I had to remove the paint. If I wanted to remove every bit of it I would have used Citistrip, but because I was going for a salvaged look, I just sanded it off and left bits of the paint here and there.

2. Stain the legs using a clean cloth or staining sponge


3. Dry brush a bit of white paint on the legs once the stain is dry, (which should only take a few minutes). Dry brushing gives a lovely, multi-dimensional effect to a piece so it isn't so flat, but it takes a smidgen of practice. First, I set the can of paint aside and use just the lid. Dab the brush into the paint collected on the lid.


Then wipe it off on a clean cloth, and brush quickly over your surface back and forth with the grain of the wood.


4. Now it's time to rope your seat. Start in the very middle, (best to measure so it's accurate), and stick a big glob of hot glue in that spot. Place the rope firmly into the glue and start gluing around a few inches at a time, followed by placing the rope over the glue. The middle is the toughest spot to get started, but once you get a few rows in, it gets much easier to handle the glue and the rope.


Finished product!


That's it! This stool would make an adorable child's step stool, plant base, or use it just as a footstool! You decide, that's the best part. I actually have a second one of these which I plan to refinish a little differently. Stay tuned! If you try this or any other projects you've found inspiring on Chelsea's Garage please tag them as #chelseasgarage on Instagram or share on Facebook. We love seeing your handiwork! In fact, check out this Swiss Cross rug, (inspired from this post), that a dear reader, Beth, made for her classroom:


So awesome! Thank you so much for sharing on Facebook, Beth - it's perfect in your room. Best of luck in the new school year!

Thank you all for stopping by!

~Chelsea


August 15, 2014

DIY - Hanging Leather Planter {from a tote!}

By Chelsea


Whew! Well we just sailed to Friday, didn't we here. I thought I'd have some more goodness to show you this week but wouldn't you know it, in a span of 5 days we lost AC, hot water, and our washing machine was down. All issues were quickly resolved within a few days and I was so reminded of how extremely fortunate we are that those were our challenges this week. Needless to say, these hiccups put a hold on some of the week's to-do's, (a familiar story to all, I'm sure).

But, I was able to finish one sweet thing to share with you before the weekend!

Hanging Leather Planter

This was one of those quick satisfaction projects. The kind that doesn't suck a whole lot of time or energy from you, but the result is exactly what you had hoped and pictured. Those are so necessary sometimes, yes? I found this camel leather tote last week at a thrift store for less than $8.


If you're into accessories this would be an awesome find! I used to be an accessories girl. Then I had a bunch of kids and they became my accessories... Funny how that happens! I still know a good deal on leather when I see it, though.

I actually bought this tote just to use it for it's leather. The hanging planter is just the first project to come from it, but I've got another that I'm looking forward to sharing soon as well! The first thing I did was lay the tote front-side-down, (with that cute pocket facing the floor), and stick my plant right in the middle of the backside. I needed to make sure that what I cut from the tote would be enough to securely hold my plant, which is on the larger side. Then I set the plant aside, took out a strong pair of scissors, and cut along the perimeter of the tote. I removed and relocated the shoulder straps and the braided pieces along the sides to use for hanging the piece. That's it folks!

The last piece was how to hang my planter. I chose a brushed nickel closet rod hook from Home Depot for $6 because I wanted the plant to hang away from the wall a bit, but there are of course other options depending on where and how you want to see your plant hanging, (from the ceiling, closer to the wall, etc).


If you're fired up to try this yourself, just know that the process and end result will look a little different depending on the bag you use. That's the fun of it, though! I would recommend finding a bag with long-ish shoulder straps so you can cut them down to use for hanging the piece. This is just a simple idea with which to expand on and make it your own! If you happen to try it out please hashtag #chelseasgarage on Instagram or feel free to share photos on Facebook! We LOVE seeing your handiwork!

Thank you all for stopping by and have a splendid weekend!

~Chelsea


August 13, 2014

Nursery Themes Using Engineer Prints

By Cate


Why hello there!  As some of you may already know, last month I shared how to make a faux pull-down chart from an engineer print.  Well since then it has become increasingly more obvious {mainly to my husband because they're multiplying in our home} that I am OBSESSED.  I mean, have you noticed how I've been sneaking them in to all my post pictures lately...?

Like here 

annnnnnd couldn't help myself here either

Can't stop won't stop.  I simply must share some more...

So because they give such a strong nod to those vintage school house pull-down charts, I can't help but feel they would be so cute for kids!  You can so easily do something custom, cute, cheap, and even educational for any baby's nursery theme {not that Caleb and I are looking for ideas - just because we're married and I mentioned the word baby doesn't make me pregnant people.}  ;)

I mean, couldn't you see this vintage car print in a boys room?
{Source: The Graphics Fairy}

How about this sweet alphabet print?

Are you seeing the potential yet?  Maybe this will help...
This hot air balloon print could take any nursery Up Up and Away...


How about a sailing ship for your Little Sailor...


Or a noble stag to watch over your Woodland Adventurer...


The possibilities are endless!  I think that last one is my fave...  Have another great idea for these cheap black & white engineer prints?  We'd love to see how you do it!  Tag us in your projects #ChelseasGarage!


Happy Wednesday ya'll,


~ Cate

August 12, 2014

Hello again, AT!

By Chelsea


Hi friends! In case you missed my shameless bragging on Facebook over the weekend, our very own Cate made a splash over at Apartment Therapy a few days ago! Her Geometric Lamp Copycat was all the buzz at AT as one of their Before & After features. Way to go, Cate!

Good choice, Apartment Therapy. Good choice, indeed.


To the thousands (!!) of new readers checking out Chelsea's Garage for the first time, we are so excited you found us! We're a DIY, Home Decor, Furniture refinishing blog, started by me, Chelsea, and featuring weekly editions by my very talented sister-in-law, Cate!

We are both so glad you're here and hope you look around through our many tutorials and projects, enjoy yourselves, and definitely stick around; Cate and I are cookin' up something big that we definitely want you to be a part of. Stay tuned!

And as usual, you'll be hearing from Cate tomorrow with an inspiring Wednesday edition! I'll be back soon to share how I turn one leather tote bag into both a hanging planter and leather drawer pulls, (now that's one amazing tote)!

Thank you so much for stopping by!

~Chelsea

August 8, 2014

DIY Swiss Cross Rug

By Chelsea


I just love heading into the weekend with a little DIY fun. :) I mentioned in our Basement Therapy post that there were a couple DIYs floating around the space, but my favorite one is actually grounding the whole room altogether.

Take a good look at the rug. Can you tell that it's a DIY?


So fun, right!?! I've been smitten with the Swiss Cross for a couple years now and just couldn't get it out of my mind. I looked online for Swiss Cross rugs but couldn't find the design in the form of a rug, (lots of pillows and throw blankets). I was hoping to see one that I could use for inspiration before making my own, but alas I couldn't find a single one. Is it possible that this is the worlds first Swiss Cross rug?!?

Doubtful. But here is how I made ours in case you've been crushing on the Swiss Cross yourself. OR this technique could easily be translated to any pattern and colors you could possibly want - Multi colored hearts for a girls room, gold stars, triangles - think about it, you guys; the sky is the limit with this one!!!

Supply list:
Plain, solid rug
Can of spray paint or water diluted paint
Cardboard

First, you need a plain, solid color rug. I found our oatmeal-y grey one at Home Depot for $20 during a brief sale - the original price was $30, and it is oh so soft. Then you need a can of flat black spray paint, (or whatever color you want). Spray paint is wonderful for this project because it's already diluted a bit, so it won't dry stiff. If you decide on a using a brush and can of paint, just be sure to mix the paint with a bit of water to thin it out.

Then take a large piece of cardboard, (mine was about 18-20 square inches), and use a box cutter to carve a Swiss cross in the middle, (or whatever shape you'd like). How large you want it is up to you. The most important thing is that it is exactly centered in your piece of cardboard so it's easier to equally space the pattern.

Yup.

Bring the rug outside and lay on a smooth, flat surface. Lay the cardboard flat on the rug and spray from about 5-6"" away, being careful not to get over-spray onto the rug. The way I got my crosses all equal distance apart was by lining the cardboard up on the crosses I'd already done. I'd line the top of the cardboard up with the bottom of the crosses on the row above, (see below), and one side up against the tip of the previous cross sprayed right next door. Spacing and arrangement is all up to you!


All finished!


Now we are off to do some Friday thrifting! If you're on Instagram you can follow all our freshest finds, ideas, and projects at @chelseasgarage. I really think our relationship is ready for this next step!

I so appreciate you stopping by and have a splendid weekend!

~Chelsea


August 6, 2014

Living Room Tour


By Cate


Guess what guys... our living room is CLEAN.  So you know what that means: it's time for a living room tour!  Let me start by explaining that Caleb and I live in a studio/ loft apartment.  As you can see in the floorplan, basically this means we live in one big room that's a whopping 863 square feet.  


Nevertheless, we are very proud of our newlywed nest.  I'm proud that I managed to make my extensive collection of roadside rescue furniture and DIY decor work for a small space.  And Caleb is proud that he found us an apartment that, although minuscule, still has more than one bathroom {1.5 to be exact} and a flight of stairs.  Now with that said, I don't know if this post will actually qualify as a tour since you can pretty much grasp our tiny living situation in one photo:


Yep you're looking at it.
That's the whole living room people and pretty much our whole apartment.
Tour over.

Just kidding.

Even though the photo taken from our lofted bedroom space pretty much covers it,  I'll still do my best to walk you through the things we have that define our living space.  


Alright, let's take a closer look at some of our decorative items. 


First we have our extra storage in this faux-front apothecary chest from Kirklands.  Above it hangs another engineer print that was converted to a faux pull-down chart.  Quick tangent: after I made my first pull-down chart in this tutorial, I was inspired to make another by this exquisite architectural alphabet print.


I did a little digging and learned that each letter was taken from a famous architectural publication by Johann Steingruber circa 1773.  Talk about vintage.  I tried DESPERATELY to get my hands on a reproduction image of the whole set with no luck.  But what I did find was a high resolution blueprint of the letter H.  H for Henderson - score!


Ok still with me?  Let's get back to the rest of the tour.  For those of you attention-to-detail CG readers, you might notice a couple of previous posts sprinkled through out the room...

   
{Geometric Lamp Copycat provides extra task lighting}

{Steve the Stag still stands on the credenza}

{Extra credit if you spotted the roadside rescue from Chelsea's suitcase table post last September}
Confession time: when she first made those tables, I was immediately smitten.  At the time however, they were promised to another project.  So when that went in a difference direction, I was ready with the rebound plan and Chelsea graciously let me inherit the pair!  

There are also a couple new-to-CG ideas in the room.  Continuing my suitcase motif, more suitcases on the wall provide extra hidden storage.
 

On our walls hang some original artwork - two acrylic paintings and one art piece made using a photo-to-canvas transfer method from A Beautiful Mess.

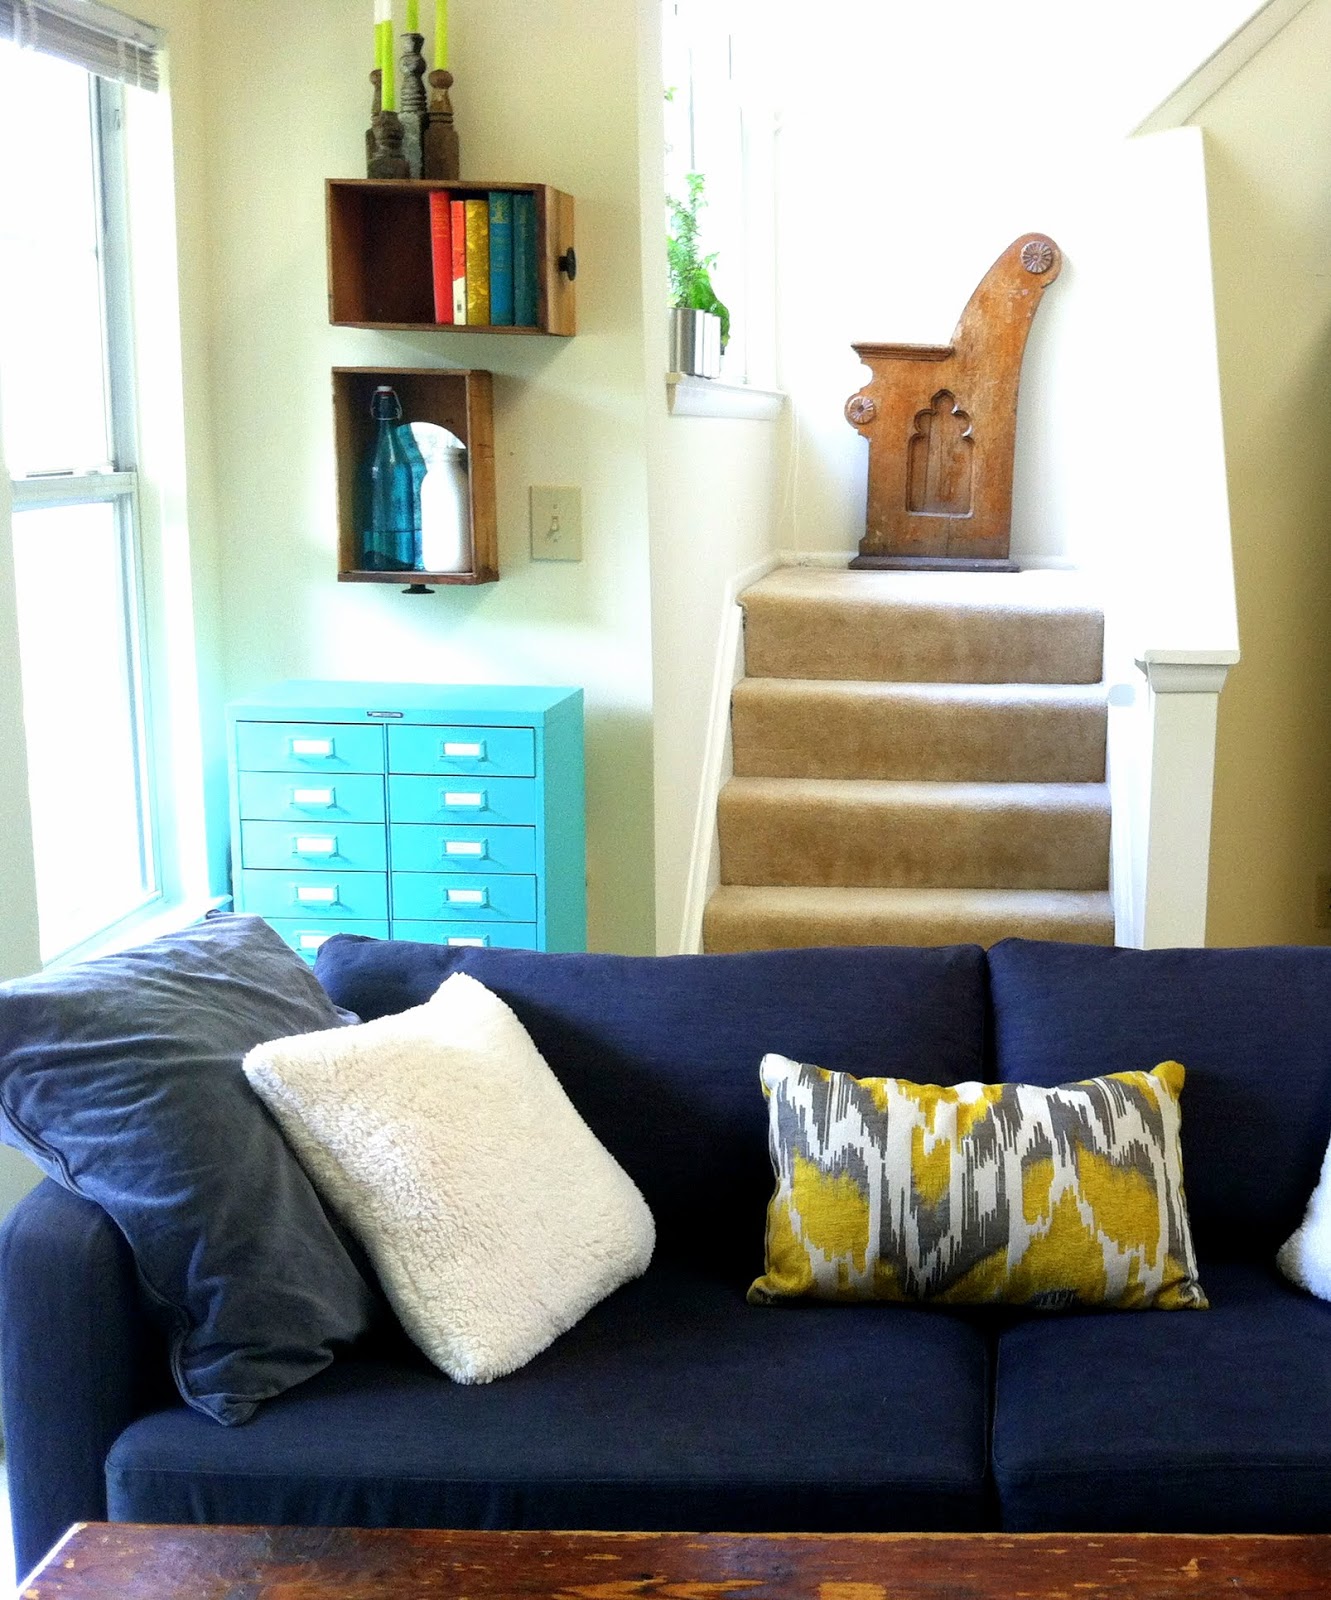
Behind the floating sofa is an old metal file cabinet that I spray painted aqua.  It provides a great place to hold all my tools since we don't have a garage.

Head up the stairs and you'll find the remnants of an old church pew from
my childhood church in DC.

 And on the window sill is an antique grate pulling double duty as a trellis.

You can kind of see in this photo that the white slip-covered sofa sits up against the kitchen counter.  What can I say... small apartment problems.  But it's great if you want to make toast without leaving your comfy spot on the couch.

The lofted ceiling does help the room feel bigger and the pops of red, marigold, and chartreuse mixed in with navy gives it a playful personality. 


I know what you're asking yourself... there are no dog toys littering the floor so where's Thor?

Snoozing through the whole tour of course...

And that concludes the tour of what is definitely the focal point of our little apartment.  Hope you enjoyed it and have a happy Wednesday!


~ Cate