
You may remember this post a couple weeks ago about some cute ideas for revamping a couple of our itty bitty bathrooms. Well, I got to work last Friday on one of them and am so excited to show you a now finished product! This is our basement bathroom before:


Medicine cabinet mirror, pedestal sink, painters yellow on the walls, ill fitted switch covers - we are grateful for the full bath in our basement but it was pretty sad looking and had nowhere for overnight guests to settle in with their toiletries.


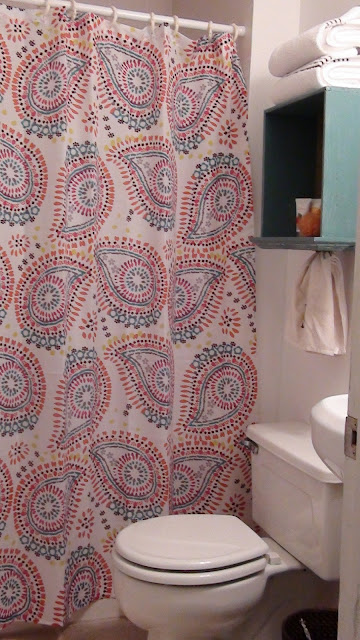
~After~


Project A: Drawer Shelf - see bottom for details


Project B: Framing the mirror - see bottom for details

Project C: Drawer face-turned towel rack - see bottom for details


Project D: Bleaching old rug - see bottom for details

So refreshing now, don't ya think? This may not be your particular taste, but here is how I approached each piece of this bathroom in case you want to try any out yourself!
First off, I purchased the shower curtain last week at Walmart just because of the colors! I had recently decided to paint the walls white and play with color elsewhere, so when I spotted this shower curtain it really started giving me ideas for what other colors I wanted to pull into the room. ($9.99)
Project A: Drawer shelf - I had saved this drawer from a large dresser that is currently getting remade into a TV console. The sheer depth of it and the fun news print floor gave me a feeling I'd be able to use it for something else. Turns out when I was brainstorming some different ideas for storage for this little bathroom, I knew I wanted to keep 'stuff' off the floor. There is hardly enough floor space for a waste basket, so a shelving unit on the floor or a basket was just out of the question. This drawer, hung on it's underside, works perfectly for holding fresh guest towels, extra tissue, toiletries, etc. I painted it a custom teal color and kept the original drawer pull to hang our monogrammed hand towel from.
(free since I already had the supplies)
Project B: Framing the mirror - I had envisioned removing this medicine cabinet mirror and hanging something oval with a scalloped frame....til I realized this cabinet was set inside the wall and I wasn't interested in any major demo for this room. So, I went to Home Depot and found some pretty 1" trim, painted it in a very soft gray, my Husband cut the proper angles, and then I used Liquid Nails to glue it to the edge of the mirror.
($5 for the trim - but you can find decent 1" trim for as little as 50cents, which I did, but this one really caught my eye and since I was saving so much money elsewhere I splurged)
Project C: Drawer face-turned towel rack - This piece is actually an old face of a drawer that belonged on another dresser turned TV console, (don't ever throw 'parts' of a piece away, they may come in handy!). Husband removed it from the drawer, I painted it the same custom teal to match the hanging shelf and then he attached a single double hook unit which straddles the middle knob.
($2 for the hook)
Project D: Bleaching old rug - This rug used to be a dusty blue, (if my memory serves me right - it's old!), and I bleached it a long time ago into a very creamy peach. I think I had it sitting in a sink full of bleach, stirring occasionally, for at least 3 or 4 hours. We didn't have any immediate use for it in this house right away so it's been in storage for over a year, but it's so soft I didn't want to throw it out. Glad I didn't! I really love how this soft color contrasts with the cool gray floor, the teal shelf and rack, the orange on the shower curtain - and it just feels good under the feet. Bonus :)
So, that's how I fixed up a once dingy bathroom into something functional, colorful, and inviting. Do you have any transformations or unique storage ideas to share?
~Chelsea
I want to come stay just so I can try out this bathroom. (ok...maybe that's not the ONLY reason) Love love love the drawer/shelf. I will keep that tip in mind in the future. I recently saw a very cute idea on pinterest for holding jewelry: take a wooden board and attach different doorknobs to it. Circle knobs hold hanging necklaces, skinny horizontal handles hold dangling earrings and the knobs you grab from underneath: turn upside down and its a cup for earring studs! Not sure if this makes sense written out :)
ReplyDelete-Kat
What a cool idea for jewelry! My jewelry box has compartments which I try to use to keep organized, but when I go to grab one little thing I end up pulling out an entangled nest of various pieces :P Thanks for the idea :)
ReplyDelete