May 30, 2014

Quick boho lighting

By Chelsea


Whew! Finally Friday and now we're one week away from the Chelsea's Garage sale next Saturday, June 7! When I saw this pin by Mandi of Vintage Revivals, I was instantly inspired to make some unique, hanging lights for our garage during the sale, (I'm a picky pinner, but if you follow me on Pinterest you'll likely find me attempting many of my pins here)! Illuminating a garage is tricky and I'm always looking for new ideas that are quick and inexpensive, but still complimenting the unique and beautiful gems that will be available on sale day.

While throwing my version of this light fixture together I didn't intend to feature the final product. But it turned out so much cuter than I thought! It was a super easy, ridiculously cheap project; totally worth sharing.


First, I just want you guys to know that I understand so many of you are starting with absolutely nothing. It's incredibly touching to receive emails from those of you who are just getting out on your own for the first time, or are starting fresh, whatever the reason. It is absolutely a pleasure to share and inspire unique design ideas that truly are inexpensive and easy for the average person with a real life budget and not a lot of time to DIY. This post is most definitely dedicated to you, for what it's worth. :)

So here's a budget friendly, time friendly hanging light idea that doesn't skimp on style, (staged in our guest 'nook', see full room tour here)!


What you need:

-Embroidery hoop, (found in the $2 range at Michaels, JoAnns, and Walmart)
-Pendant light cord, (the kind that plugs into the wall is easiest, less than $10 from most hardware stores)
-Beaded necklace, (free if you have one you want to sacrifice - optional for this project)
-Gold spray paint, ($3 at most hardware or craft stores - also optional for this project)

Instructions:

Spray paint the light cord, (spray the whole thing, unlike me. I was at the end of my can of gold spray paint and it sputtered out with 1/3 of the cord left, as you can see). You'll have to do this in several steps, letting one side dry, then rolling it over and spraying the other side. Wrap the necklace around the neck of the light socket and tie and tuck into place. Tie the cord around the embroidery hoop about 5" above the neck of the socket. Screw in a white light bulb. And voila! You're done! How you want to hang this is completely up to you - you can either hang a simple command hook on your wall, (they have metallic ones now!), and loop the cord over the hook and plug into the closest outlet. Or you can screw a hook into your ceiling, hang the cord from there, then tap in some wall staples to hold the cord into place along the ceiling and down the wall. (Tasteful) exposed cords are in, baby! Especially bright or metallic cords. I'm totally embracing this trend.


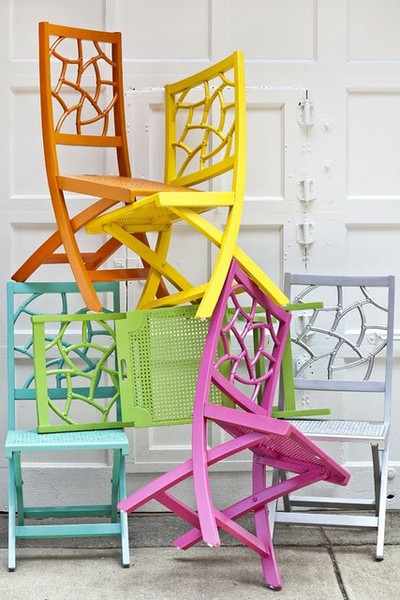
I've got a couple of these made already to hang around the garage on sale day. Are you stopping by, local friends? Please do! My sister-in-law, Cate, and I have been refinishing up a STORM and will have gorgeous pieces available for browsing and taking home. You'll find dressers, buffets, desks, coffee tables, accent tables, accent chairs, benches, lighting, rugs, and various homemade home decor accents. If you follow CG on facebook you may get a few more sneak peeks over the next week ;) So save that date, June 7, grab some friends, and come on over for a fun time!

Chelsea's Garage sale
Saturday, June 7
9am-3pm
Herndon, VA, (email chelseasgarage@gmail.com for the address)

Have yourselves a wonderful weekend!

~Chelsea


May 29, 2014

5 tips for picking the right hardware, {or making your own}

By Chelsea


Hi guys! I just couldn't talk about choosing the right paint color for your piece, (see yesterday's post), without bringing up hardware. It's like accessorizing! Accessorizing...I used to accessorize in my previous life, BC, (before children). Anyways, I believe it's just as essential to choose the right hardware for your piece as it is the right color prior to refinishing. Here are some options!

1. Keep the original:

This is the easiest option, and sometimes the best! Whether the piece has such unique and specific hardware that you can't or don't want to replace it, or you're simply content with the hardware as-is, this option is fuss free and can be a beautiful choice.


2. Spray-paint the original hardware:

If you like the style of the hardware, but not the finish, just remove the hardware and lay it on a flat sheet of cardboard, shake a can of spray paint, and spray an even coat over all your pieces, (don't forget door hinges, too, if you have any). You don't even have to choose a flat color; there are various metallic spray paints available, too!


3. Paint the original hardware:

For a warm and cozy monochromatic look, you can also paint your hardware the same color as the piece. This is a popular choice with those wanting a vintage, french-country look.


4. Make your own:

Sometimes it's worth thinking outside of the box and using materials you have at home in place of hardware! Scrap fabric, leather belts, and sisal rope are a few materials I've used in place of hardware before. The great thing about trying this option is you can use the existing hardware holes rather than having to create new ones!


5. Buy brand-spankin new:

Sometimes you gotta take the plunge and it's totally worth it to do so. That happens. Just make sure to compare prices so you're finding the best deal. There are sources online that offer fantastic but inexpensive hardware. I've used ATG Stores online and Ebay, primarily.


If you've got more hardware ideas you'd like to share, (or fabulous sources for finding inexpensive hardware), please fill us in in a comment below! 

Thank you for stopping by!

~Chelsea

May 28, 2014

Bold vs. Safe {5 tips on picking the right paint color}

By Chelsea


Hi friends! The topic for this post hit me hard the other day when I was staring at these two pieces, (both for the sale on June 7!), pondering how to refinish them.


 Even those pieces which I intend to refinish and sell typically have a clear direction in plan from the moment I see them. It's either, "Oh yes. This will be a stunner in French Linen!" or "Spring Mint. Hands down." But every once in a while I'm as torn as trying to decide on which Ben & Jerry's masterpiece to bring home from 7-Eleven, (we've all been there; I'm not ashamed).

And I know a lot of you have had this predicament as well. I get this question weekly: What color? Whether it's your great-Aunt Nillie's curio cabinet or a worthless dresser you found for nothing at a yard sale, you face a big decision if you intend to have the piece refinished or refinish it yourself. 

What color???
Source: shopstylesociety.com
For anyone out there asking that question right now, or perhaps in the near future, here are a few tips off the top of my head that may ease your decision making process. Here we go, in no particular order:

1. Take some good photos of your space and spend a bit of time looking over them. I think we see our rooms differently through pictures than in the day-to-day passings from room to room. The question of what color to paint a piece should start by assessing the space it will go. You may have seen a smear of Orange Sky by Benjamin Moore in House Beautiful and think it's a lovely shade of yellow, but can your space handle such a powerful color? Show your photos to a trust-worthy friend, (whose style and taste you admire), and ask their opinion. Fresh eyes are always helpful.

Source: Chelsea's Garage
Helpful tip: Chelsea's Garage is a great source for fresh eyes. Send a photo of a space you'd like advice on, (whether it's help trying to decide on a paint color for a new piece or even furniture arrangement), and we'll reply quickly with our thoughts!

Source: inthefunlane.com


2. Do a Pinterest or Google Image search of similar pieces to yours, painted. You may just see a photo that hits you deep within and you know that's the direction you want to go with your piece. When I saw this pink table by Holly of In the Fun Lane, I knew I wanted to do something similarly fun and bright in our otherwise neutral dining room, (keep reading)!

3. Give yourself a quick psyc exam: Do you have a history of making big, bold style choices that have affected you positively and increased your confidence in your unique taste? If yes, then go bold! You can handle it so be brave and take the leap. If you're thinking, 'not so much', that's okay! Then there's no dilemma! Go easy on yourself and choose a soft neutral that you know you'll like. There is no sense in trying to like a look that you know isn't you.

For the neutral lovers out there, here are a few of my favorite Annie Sloan Chalk Paint neutrals: 
Old White, (shown below), Paris Grey, French Linen, and Country Grey.
Source: Chelsea's Garage
4. On the fence? Be bold and safe at the same time with a color that works well as a neutral. When I decided I wanted to do a bright color in our otherwise neutral dining room, I chose this aqua, (Duck Egg by Annie Sloan Chalk Paint), because to me, it does work like a neutral. Colors that are very earthy and natural are like chameleons - you can slip them into just about any color scheme and make them work well.

Source: Apartment Therapy, (from our Home Tour)

Source: Chelsea's Garage


Another color that I love using as a neutral is Chateau Grey, also by ASCP. It's the color of moss; you can't miss with that!

5. Let the piece speak for itself. When I'm working on a true antique, I like to maintain its character by using a classic, soft neutral. This is one of the reasons I love working with Annie Sloan Chalk Paint. Annie Sloan has studied the history of color, primarily throughout Europe. If I'm going to paint over a rich piece that has stood the test of time, I like to respect the age and era it came from by using an equally rich and classic color.

Recognize this one from the first picture up top? It spoke loud and clear and I ended up using French Linen by Annie Sloan Chalk Paint.
Source: Chelsea's Garage

If you ever want some help deciding on a paint color for a piece of furniture, contact chelseasgarage@gmail.com; we're here to serve!

Thank you for stopping by!

~Chelsea

May 26, 2014

Peek-A-Week #5 {Two-Toned Table}

By Cate


Happy Memorial Day all!  We are so thankful to all those who serve, have served, and gave their lives for our country.  As a diplo-brat myself, I have had the honor of meeting a lot of wonderful service men and women in my travels.  Wherever you are serving today, I hope that you are safe and know we at Chelsea's Garage are grateful for all that you have done.

For all you readers here on the "home front," I have another sneak-peak for you!  Since the June 7th Garage Sale is also my debut, Chelsea and I thought I should do this week's peek-a-week.  

Voila!  A two-toned coffee table.


When I found this table at local thrift store, it was an outdated yellow mess.  But underneath all that scratched-up polyurethane was a beautifully intricate weave design.  So I applied my trusty Citristrip and let it do its magic.  After a couple of hours, that polyurethane flaked right up and was easy to scrape off so I could stain the natural wood.  You can see some pics of the process below.


From yellow to handsome-fellow (see what I did there ;)

I re-stained the top with a warm Colonial Maple Minwax stain and painted the trim and legs with a crisp white homemade chalk paint.  I would have used some Annie Sloan Pure White, but I was too impatient to run out and get some.  I did, on the other hand, have a generic flat white and some Plaster of Paris - the two key ingredients in a homemade chalk paint recipe I found on LiveLoveDIY.


Now the inlaid design has been restored to its natural glory.

Just a touch of distressing to revive the lines of the piece.


Anyone for a cocktail party?


I know what you're thinking... That re-finished table top looks YUMMY!


And that reminds me!  Did we mention we will have refreshments at our June 7th Chelsea's Garage Sale?  As if you needed another reason to stop by...  

FIFTH Chelsea's Garage Sale
June 7th
9am - 3pm
Contact us for the address - located in Herndon, VA


Hope to see you there!

~ Cate

Interested in this piece?  Please contact Cate to see it in person!
Dimensions 25"L x 37"D x 20"H
SOLD


May 23, 2014

Roped in sisal {DIY desk and lamp}


By Chelsea


Happy Friday, ya'll! We're workin' with rope again today! Yeehaw! I'd like to think I would have been a darn good cowgirl if, you know, I hadn't grown up in suburbia Northern Virginia. Oh, the what-ifs... (actually, I was responsible for two dozen horses by myself one weekend when I was 10 years old and working at a horse farm in exchange for riding time. The weekend wasn't a complete disaster)

Earlier this week I shared how to hang art with sisal rope in order to add visual substance to an empty wall:


Moving onto furniture, I've got two more ideas for our handy sisal rope! 

1. Trim a recovered seat:

One of the first DIYs I learned was how to recover a seat. My parents gave us an extra staple gun that they had, which is really the only tool you need. That, and a screwdriver to remove the seat cushion from underneath. Once your seat is off, you can remove the existing fabric, (though that isn't always necessary), and then place your seat top-down on the new fabric. Pull the fabric moderately tight over the edges of your seat and staple away! Once your new fabric is attached and you've trimmed off any longer edges and ends, you can screw the seat back on. This is where I wash my hands and call it a day since I don't know the first thing about making or attaching piping cord. Depending on your seat, sisal rope might be the perfect answer!


For this project I plugged in our hot glue gun to let it 'pre-heat' and then measured and cut the proper length of rope I would need to wrap entirely around the seat. After I was done cutting the rope, the glue gun was ready. It was best to work slowly in one small 4" section at a time as the glue dries so fast! I just made a 4" strip of glue along the seam of the seat and then pressed the rope right over the line of glue. I love this alternative to piping cord and it was super easy!


2. Rustic roped lampshade

While the glue was still hot I decided to experiment with this stripped lampshade that was collecting dust in our garage. I pre-cut all the pieces of rope that I would need and set them aside within reach, working in small sections at a time. This project was a little more tedious as I had to go super slow with the glue to ensure it didn't drip off the wire frame. The end result though looks so cool! It totally has that rustic-chic Pottery Barn vibe going on. Pop in a little Edison bulb and it's a unique, sophisticated floor lamp!


Surprise! These pieces will be available at the June 7 sale.
9am - 3pm
Contact me for the address if you'd like to stop by!

As always, thank you so much for reading and have a wonderful weekend! 

~Chelsea


May 22, 2014

Right-Brained vs Left-Brained: How I Organize Jewelry

By Cate


A while back I read an article in Real Simple magazine called Organizing for Your Personality.  The article diagnosed the difference between left and right-brained people and was illustrated with photos of how each differs in organizational style.  Left-brain organizers like order and each thing has its perfect place.  Right-brain organizers like to sprawl out, display, and draping pieces in unusual places.  I remember ripping out every-other page to save for future inspiration (this was pre-pinterest mind you).  And when I took their little "Which Side Do You Think With" quiz, I found out that surprise, surprise... I'm a mix of both.  So lets see with these 4 examples below just how this right-brained-left-brained-ness manifests in my own jewelry organization. 

1} Right-Brain: a hand-towel stand to display bracelets

When I found this towel stand at a thrift store it was originally brass.  At the time, I was not in love with brass like I am now but I liked the bird on the top.  So I spray painted it a glossy white to give it a ceramic effect.  Now it is a handsome holder for my bangles and caters to my right-brain need to drape my jewelry in an unusual place.


2} Left-Brain: a printers drawer to organize your favorite pieces


Printers drawers are multi-compartment trays originally used to hold the alphabetical character blocks for old printing presses.  The various compartments are perfect lefty organizational tool for small knickknacks of all shapes and sizes.  Growing up, I had one hanging on my wall displaying everything from found objects, to figurines, to my coin collection.  Now it proudly sits on my dresser and corrals all my jewelry in tidy little quadrants - keeping earrings in their pairs and organized by color.  Selecting the perfect accessory for my outfit is as simple as a quick browse.  Plus there's something soothing about seeing everything in its place.


3} Right-Brain: a window shutter to hang long necklaces

A few of my pieces were too chunky or would get tangled sitting in the dainty storage compartments of the printers drawer.  So to appease my right-brain, they drape willy-nilly off an old window shutter.  Found at my local Habitat for Humanity Restore, the shutter now shows off my biggest statement pieces.  Hang it next to a mirror to allow for easier accessory decision making ;)


4} Left-Brain: a file organizer to hold clutch purses  

Finally, my left-brain would like to present: the file organizer.  With all the cute desktop organizers out there, you really can't go wrong by teaming them up with a good purse collection.  And envelope clutches are the PERFECT size to sit in a file organizer.  Nice.  And.  Tidy.


I found my "ETC." vertical-standing desk organizer at a Home Goods. 


Which side do you think with?


~ Cate