July 30, 2013

New world discovery: Bemz!

Okay, here's the deal: Last week I stumbled onto something pretty awesome, (to me), and as I'm sitting here writing this post, I'm crossing my fingers that I'm not the very last person to have found it. Because that would make this post pretty lame. So, I'm gonna go out on a limb and hope that my news is reaching at least a few who, like me, did not know about this pretty awesome thing before.

So here it is.

Ready?

There is a site that makes over 200 slipcovers specifically for IKEA pieces.

Introducing for the first time on Chelsea's Garage,

I am a big fan of IKEA and have responded to many inquiries about where we got our living room sofa and chairs, (IKEA Ektorp collection). As someone who appreciates versatility and quick change-outs here and there, slipcovers are a great fit for me, (and my young and often sticky family). IKEA pieces are appealing because they don't look like traditional frumpy slipcovers. You can still get your clean and polished look. Only problem is...IKEA doesn't offer a great variety of slipcovers. You get your basic neutral solids, maybe a bright red and blue, and a print here or there, depending on the piece.

Bemz literally has hundreds of fabrics to choose from. Their slipcovers are made for everything from sofas and armchairs to footstools, cushions, and even bedspreads, bed skirts, and headboard covers for the cozy upholstered look! They also let you order up to 5 FREE fabric samples to help you choose the right fabric for your home!
Our fabric samples

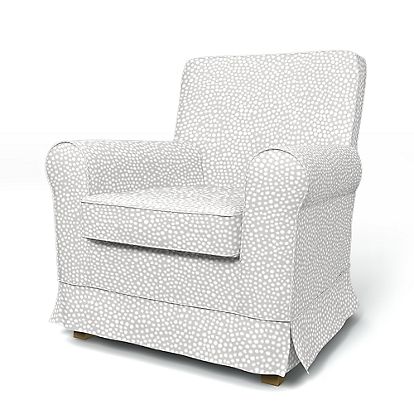
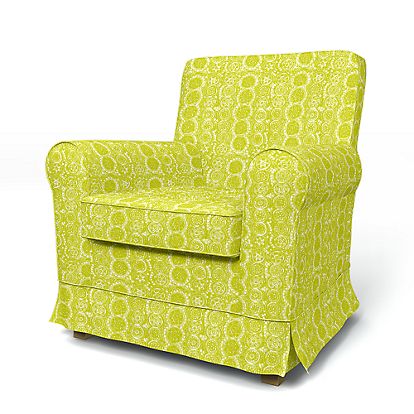
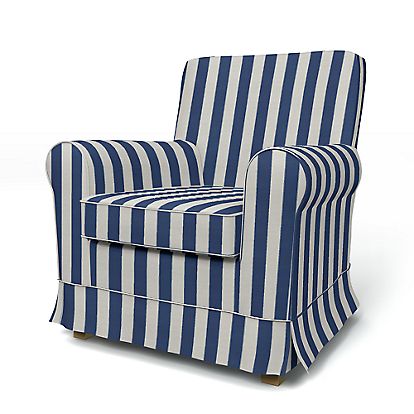
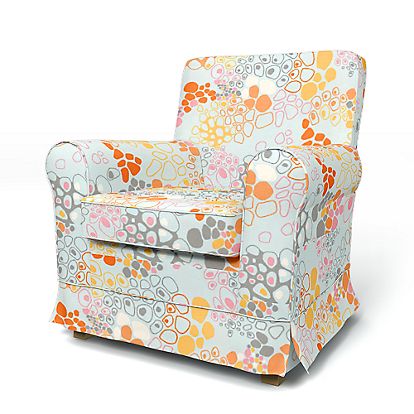
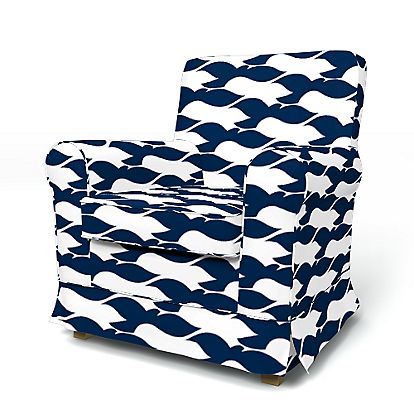
Here's a bit of eye candy from the Bemz home site. All pieces slipcovered in their own custom fabric...


Klippan sofa cover Designers Guild Bayshore Magenta

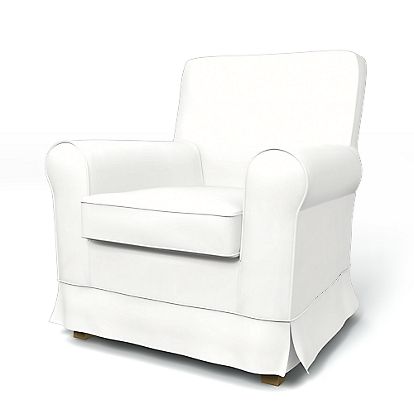
The Bemz site also lets you 'try on' all the fabric options with the various IKEA pieces. For example, let's say I want to change out the white Jennylund chairs we have now in our living room:

I can try on a plethora of options!

The blue birds is my favorite. Hands down.

*They also have beautiful rich fabrics such as chenille and linen which take your basic IKEA pieces to a whole other level of sophisticated style*

You get the picture. It's pretty awesome, right!?!

And IKEA would probably disapprove of me spreading this around, but their pieces are ALL OVER CRAIGSLIST AND YARDSALES! So, if you find what you're looking for used, then you pay a fraction of the full IKEA price, (which is really quite reasonable to begin with), and then spend a little extra on a custom Bemz slipcover! We found our entire living room set, (Ektorp sofa and two Jennylund armchairs), on Craigslist by different sellers. Since we paid so little for the pieces, I wouldn't mind spending the saved money on fresh slipcovers that look made for our home and style....you know, when the time comes for a change. :)

So what do you think? Would you Bemz out your home?

Thank you for reading!

~Chelsea


July 29, 2013

Timeless custom grey dresser

Hi guys! I'm excited to kick off the week with a hot-out-the-garage newly refinished dresser. Dressers are my favorite. <3

When I acquired this one I didn't have a specific plan of action in mind. I kicked around a few ideas but it really wasn't until I took an afternoon to spend working on the piece that I finally decided on a look.
Classic. Elegant. Sophisticated. Timeless.

Those were the words that came to mind when I stood there looking at this dresser before even pulling out my paintbrush. It's got beautiful lines with classic details and I really wanted to keep the character intact. I decided on a soft, neutral color, (50/50 Paris Grey + Old White by Annie Sloan Chalk Paint), and used the original hardware, which I just think is so lovely. I'm not opposed to changing out hardware and have done so on many pieces, but sometimes these old brassy pulls look so elegant to me, especially when backed by a soft neutral white, grey, cream or khaki.

It's been a while since I've worked my hand over some dentil molding. What a sweet and sophisticated detail!


I used a light touch when distressing this one. I just wanted to highlight the lines of the body and drawers.


{Piece is available for sale, $325}
50 x 31 x 17

Thank you for stopping by!

~Chelsea

July 26, 2013

~Before and After~ Antique table

Hi guys! I was so grateful for the opportunity to work on this piece this week so I could show you before the weekend! The transformation is one of my favorites.

This table came from my grandmother, Mamoo. She's had it in her garage for years as a spot to keep all her gardening tools. The first time I saw it I loved it. While simple, it's still a unique piece which could be used several different ways; and I tend to gravitate toward versatile pieces. When Mamoo told me she was cleaning out the garage and generously offered it to me, I couldn't wait to get started!

Here is her table before:

After:
I sanded all the paint off the table top and stained it in Ebony by Minwax Wood Finish, (see the end of the post for a staining tip). Then I painted over the rest of the piece in Old White by Annie Sloan Chalk Paint. For these legs, steel wool was my distressing tool of choice to reveal some peeks of the original green, which is just so pretty. 


Once removing the layers of paint from the top I noticed tons of imperfections in the wood. The wonderful and horrible thing about using a super dark stain such as this is that any imperfections will make the tone of the wood look uneven. In this case, it was a wonderful thing. I think the table top looks like it was made from salvaged, weathered pieces of wood. Yet, it's smooth as a baby's bottom, making it an ideal spot for some handwritten notes, (people still do that these days, right?)


I've never seen pull-out table leafs like these. They fit perfectly under the table and pull out with ease. One could get pretty creative in how they use those extra 9" per side. 


You can see here how the leaf tucks right back in when not needed.

{Piece is available for sale at $350. Dimensions are 41 x 29 x 29, pull-out leafs are 9"}

Staining Tip:
I don't brush stain on, I wipe it on using paper towels, (so I don't have to spend my whole day running cloths through the laundry to remove the stain, which gets messy). I start by rubbing the stain on in circular motions to really 'sink' it into the wood, then follow that with even back and forth motion.

And as usual on a Friday, here are some highlights from our week :)

Enjoying the Anthropologie "bird house city" window display with my little bird.

3 fountain wishes. Ok, this shot of Mason, (middle), is killing me. What a goof!

Speaking of Mason, he and I had our first ever time out alone with each other. He was born into a chaotic household, (the twins were 16mo), and did a beautiful job jumping right into the thick of it with the rest of us. But I soaked up my time alone with him like a sponge. His gusto and thirst for adventure is contagious and sometimes I need a good dose of that!

Sometimes we all just need to be alone.

And speaking of alone, this is where I found my precious little introvert the other day when he wasn't downstairs playing with his siblings. Chillin in his room making matchbox car traffic, as usual. I am so blessed by his sweet, gentle heart.

Thank you all so much for reading! Have a lovely weekend!

~Chelsea

July 24, 2013

Royal blue parlor chairs

I couldn't help myself. This set of 4 turn-of-the century blue velvet parlor chairs just seemed like an appropriate project for this week as the exciting news of a little prince made its way across the pond. 

These chairs came with the blue velvet loveseat that I posted last week and are upholstered in the same fabric.

Before:

After: 
I painted two thick coats of Paris Grey and dry-brushed a thin coat of Old White, both by Annie Sloan Chalk Paint. See my dry-brushing tip at the end of this post.


{Available for sale as a set of 4 at $400, or pairs of 2 at $240}

Painters tip:
Dry-brushing is a great way to achieve a weathered, layered look with your paint. Make sure your first color goes on thick. Then for your top color, just dip the very tip of the brush in the paint and wipe off the excess across the edge of the paint can. Cover small areas at a time with your brush, moving back and forth swiftly and evenly.

Thank you for reading!

~Chelsea

July 22, 2013

I can Ikat; you can, too!

Try saying that five times fast!

Every now and then a piece which is up for sale will stick around a little longer than I anticipate. And as they sit lonely in our garage awaiting a new home, fresh ideas for how to refinish them start to bubble up - not all the time, but sometimes. I've posted 're-do's on here before and I've got my favorite re-do to show you today! It's not really a re-do as much as an add-on. 

Here is a very simple little drop leaf table I did a few months ago. I painted the top and the legs in Old White by Annie Sloan Chalk Paint. Drawer left in original finish with original antique hardware.

After it sat and collected dust for a while, I felt like playing with it a little more


Ikat is a super trendy pattern right now; as it should be! It is fun, vibrant, and brings a laid back, relaxed vibe to traditionally formal spaces such as living rooms and dining rooms. There are a zillion variations of ikat when you google image the print. What's not to love? I decided to try my hand at creating an ikat pattern on my unsold table with a simple kitchen sponge, plastic plate, and one of my favorite Annie Sloan Chalk Paint colors, French Linen. I cut my kitchen sponge down to the simple ikat shape, (basically a diamond, but I left my long edges rounded). 

Then I dipped my sponge into the paint, wiped the excess across the edge of the plate, and pressed it onto my table in imperfect rows. I eyeballed my rows to stay consistent but it wasn't precise. (You can also see the dark wax I added to the top surface)

My little bird, itchin' to help.

And a very good help she was!

Our little table before rubbing it down using a medium grit sanding sponge - my favorite distressing tool. I wanted the pattern to look faded and worn, which was an effect the sponge already helped create with it's natural texture.

Then I took a pretty standard break for some twin love before sealing our table up and bringing it in for pictures.


{Wouldn't you know it, this table sold before I even had the chance to post it here}

So there you have it; an easy DIY ikat project you can easily do from home! This would also be cool to try on canvas to create your own custom art. Or tea towels. Hmmm...Christmas is 5mo away... :)

Thank you for reading!

~Chelsea