October 31, 2012

Paper wreath tutorial

Hi friends! What an interesting last few days we have had at our house! Starting last Wednesday night every person in my family, (myself included), caught some sort of bug/flu over the following 5 days. Yuck! Then, overlapping the flu, we were hit with hurricane Sandy! We are very fortunate to have absolutely zero effects from the storm on our home or property. Every time I flip on a light, take a shower, feel the warmth of the heat, or simply zap something in the microwave, I am so grateful that the Lord protected us. There are many who have suffered/are suffering from this great storm and my thoughts and prayers go out to them.

While we have been counting our many blessings, we have also been looking for things to pass the time inside as we haven't left the house in 5 days! The kids have reaped the benefits of my cabin fever as I have bent some rules just to keep things interesting. I piled our main floor furniture against the walls and on top of the dining table and brought their bikes inside so they could race around like a mini biker gang. We've taken apart our basement sectional to make a massive fort! I took real food down to the kids play kitchen that they got for their birthday so they could pretend they were actually cooking and serving, (a mess that I fully anticipated, enjoyed in the moment, and hated cleaning up). Yes, the kids have been busy and quite enjoying themselves!

To relieve my own cabin fever, I decided to make a paper wreath during the kids' nap time yesterday!

This wreath will be donated for a silent auction that will benefit a fantastic cause supporting education for underprivileged kids in Washington D.C., (please see info here - totally worth a few seconds to check out). It's the second wreath I've made like this but the first time I've photographed the process so you can try it yourselves!

Supplies:
-2 books of slightly different colored pages for a bit of contrast in your wreath
-Stapler
-Craft glue
-Black paint & small brush
-13"-14" foam wreath frame


Step 1:
Paint the outside of the pages of your books black. This will give each individual page of your wreath a little punch so you can see the contrast
 
Step 2:
Tear out pages one by one and shape into a cone. Staple the ends. I make the outer edge of cones on the wreath like this....
 
...then I make all the other 'layers' of cones in the wreath like this, with a double fold at the bottom of the cone.
 
Step 3:
Drag a strip of glue across the bottom of your cone
 
Step 4:
Stick the cone on your wreath frame, tucking in each cone one next to the other, working from the outside of your frame towards the inside. When you are starting a new 'layer', make sure you are tucking the cones in close to the previous layer so you don't have bare spots.
 
*As you work your way in, your cones will start facing the inside of the frame, as you can see in this picture. Once it looks like you can no longer see much green of the frame, do one final layer just as you have been doing, but face the cones outward. I tried to get a couple pics of what I'm talking about...look at the inside of this wreath - you can see how the very inside cones are facing out, and the layer of cones above them are facing in.

 
Your beautiful final product!

 
This is one of my absolutely favorite DIY projects. I got my books at a thrift store for pennies a piece, the black paint and glue I already had here at home, (but you can purchase them at Michaels for just a few bucks), and the wreath frame was around $10 at JoAnns Fabrics, (they are a few bucks more at Michaels, around $13, I think). So it's a very inexpensive project that looks like a million bucks when it's finished! Well, maybe not a million...but definitely classy and elegant, (in my opinion).
 
Have you done any fun projects from home recently? Or seen any cool ones you'd like to try?
 
~Chelsea
 

October 26, 2012

Items ready for sale day!

Over the last couple weeks I've been able to make some big strides with some of the larger pieces I will be selling at the November 17 sale. I'm not gonna lie, I love doing large pieces. The bigger the piece, the bigger the thrill I get from transforming it, (though I think it's time I start saving up for a paint sprayer! Doing these beasts by hand and brush is a workout!)

Please excuse the photography situation. I simply do not have the time right now to move these big boys inside my home and stage proper photos for you. I will have them decently staged on the November 17 sale day and will certainly take better photos then. But for now these will have to do.

{Large Aqua                                       }
(fill in the blank....dresser, sideboard, buffet, entertainment center...)
*Refinished in a beautiful saturated aqua and heavily distressed. I decided to use the original brass hardware, but spray painted it black, (Rustoleum brand is the best canned spray paint I've come across)
 
{Gray and Cream China Cabinet}
*I removed the dated glass doors months ago, painted them, and sold them as decorative wall hangings. I love this more open look! The inside has been finished in a custom mixed gray that is both warm and light. The outside is a layer of the same shade of gray with a top coat of creamy white, sanded down to let the gray peek through. New hardware and added molding to the vertical rails that support the shelves give this piece a polished feel without losing it's light and airy vibe. (shelves yet to be added)


Again, my apologies for the setting of these pictures! You wanted to see the inside of my garage, right? ;) Better ones to come, promise!
 
I was about to post this as-is, but then remembered a mirror I did a little bit ago that I never told you about. This mirror has a creepy story though so I thought this would be an appropriate time to share! I was taking off the backing of the mirror so I could remove the glass, (I like to paint the front and backs of mirror frames so there's no unflattering peeks of the original color in the reflection along the sides of the mirror), and as I pulled the backing off there was a colony, (a colony I tell you!), of stink bugs, living inside. This mirror had just been picked up from a local thrift store and I started work on it that afternoon. A very good lesson to all my thrifter friends - take non-new things apart and check them/clean them thoroughly before you bring them in your home!!!
 
{Large Greige Mirror}
*Refinished in a warm greige, (to my Dad, Matt and anyone else who doesn't know what I'm talking about, greige IS a color - a cross between gray and beige), very lightly distressed, and sealed in clear glaze. Available at the November 17 sale.


That's it for the next few days! Now my attention will turn from furniture to my favorite soon-to-be 3 year olds' birthday!  Our twins are as different as could be so it's an interesting, (and time consuming), challenge to make both feel special and celebrated on their birthday. But, time well spent and I wouldn't rather be doing anything else. :)
 
Have a wonderful weekend!
 
~Chelsea


October 25, 2012

Window turned headboard - DIY

*Shire's room has had a big transformation. You can find updated photos in the Tour Our Home link!

Hi all! Busy day and weekend ahead - Colin and Shire are turning 3 in a few days and we want to make their big day as special as possible! Before I head out for the day I just thought I would drop in really quick to give you the low down on the windowed headboard I made for Shire's room!

First, these old windows are a dime a dozen! You can find them at pretty much any antique store for a few bucks. Also look on the side of the road :) I often see them by peoples trash cans! This one, in particular, was perfect for this project because of it's dimensions. I have several other windows in the garage, but none that are rectangular, (though square would do just fine, too).

I have tons of scrap fabric in my home from all kinds of things. I played around with some different fabrics behind the glass and decided to just stick to fabric that I was using elsewhere in her room, to kind of tie them all together. Once I decided on my fabrics and where each one would go behind the glass, I just layed them out, one at a time, over each individual pane, and staple-gunned them along the wooden edges. After I stapled one fabric on, I would trim the edges close to the staples, and then do the next fabric. I didn't bother trying to cut the fabric to size before doing the stapling, especially because I knew I would be doing a lot of pulling to get the fabric tight.


I picked up a couple large size sawtooth hooks, nailed them along the back top edge of the window, and hung the finished product a few inches above the bed - with Matt's help...he likes any opportunity to used his handy stud finder and laser level ;)


For more fabric fun, check out these awesome tables, 
and take a look at Shire's dresser knobs here!

Linking up at 

~Chelsea

October 22, 2012

A room for Shire

It is done and it is sweet. It has the aroma of fresh flowers, a peachy glow from a peach lampshade, and is now filled with the sounds of soft songs and sweet chatter from her small elf voice. Shire officially has her own room and our little men are two happy roommates. You may recall this post back when I was collecting ideas and inspiration for Shire's room. I basically took my favorite ideas from that collection of rooms, tweaked them, Shire added a few of her own touches, and over the last couple months I have worked on each piece of furniture, art, and bedding until the collection for her room was done and the kids seemed ready to switch.

 {Welcome! Do come in...}

This white chenille blanket with the peach trim detail and soft blue and green accent flowers I found at an old antique shop during a visit to Lititz, PA. It was one of the first items I got for Shire's room and set the tone for the colors around the room.

I will post later this week how I did the headboard; it was very easy! Each of the fabrics I used behind the window glass is used elsewhere in the room as well!

My sweet friend, Megen Minter made the awesome accent pillows from fabrics I found out and about, (read about them here). If you want custom pillows made, contact her at megenminter@gmail.com!

I painted this night table a custom peach then roughed it up a bit. Homemade drawer pulls from strips of white linen soften it up.


Shire picked out this wrapping paper and I used it as the background of this verse that Matt and I put on her first Christmas ornament. The bird I just traced from a computer image and cut on scrapbook paper.

Framed fabric. Such a simple and sweet way to fill up some wall space!

Fabric tassels! A fun, whimsical accent for a little one's room.
Learn how to make them here!

 I use glass candle stick holders to keep Shire's hair accessories contained.

 Her 'whatever' nook. She can read, draw, or do whatever it is she likes to do when she's not asleep :)

I painted the desk the same saturated aqua color as the rustic stripes down her dresser. The stool seat was recovered in a tablecloth Shire found while on a date with Momma to Lucketts.


The story of Peter Rabbit, displayed in pictures, is thrown up on her wall for the fun of it :)
How-to found here.

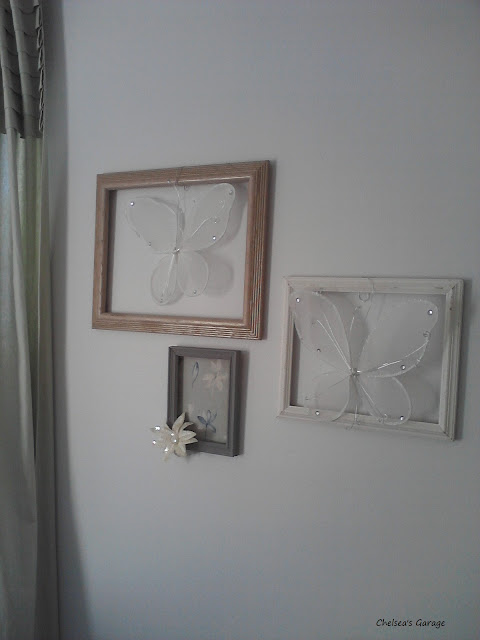
 Last but not least, the butterflies. I found these butterflies when Shire and Colin were just months old. I had the privilege of a couple hours out by myself, (thanks to my Mom), and found this cute little gift shop in downtown Vienna. These butterflies were in a large basket, all tangled up and missing antennas and wings. I fished for the best 3 and went to pay, (they were marked at $3 each). When I went to pay the woman told me to just take all of them for $5. So I got 7! They've been in a bag for almost 3 years. Now I have them hung inside these frames....

...and above her bed. Shire has told us the "ba-fries" are her favorite part of her room and that they flap their wings. I am positive, in her mind, they do!


This room was too much fun to work on. Such a labor of love for my daughter. It was awesome working on it with her and asking her opinions about certain things...my hope was that she would feel a sense of ownership over her room and understand that she helped to create and inspire it! The very best part, though, is walking from my bed across the hall over to her bed and crawling in to snuggle, (while we listen to the sounds of 'boy' on the other side of the wall). :)

Thank you for reading!

~Chelsea


October 18, 2012

Mark your calendars!

You are cordially invited to
Chelsea's Garage, Autumn Sale
Saturday, November 17
10am - 4pm
Herndon, VA
(contact me for the address if interested)
 
Here are some photos from previous events!


And here is a sneak peek of some pieces that will be available at this sale:


There is so much more, including a gorgeous 72" dining table with 4 recovered dining chairs, a large sideboard with lots of storage, and a beautiful china cabinet! If you're local, (or up for a little drive), come on over to check out the goodies and enjoy a warm cup of cider. I'd love to see you!
 
On another note, Shire's room is almost done! I'll soon be posting a little photo tour of her new space as well as some 'how-to's for some of the projects that were particularly fun to work on.
 
Thank you for stopping by! If you are a regular visitor here I would like to invite you to become an official Garage Guest, on the left hand side of this page. This way you can easily leave comments on posts that you want to share your own ideas about, (I LOVE hearing about your projects), and will help me to set up advertising on my blog in the future, (no plans yet, but it would be a nice option). Thank you so much! :)
 
~Chelsea