August 29, 2014

Decorating: Second Hand Style {+ a brief MIA}

By Chelsea


Alright, friends; it's about to quiet down here on the blog for a short bit. As we've been sharing over the past week or so, Cate and I are working on our new DIY resource blog, Style Mutt! We'll be using much of this coming month to work on the site and hope to have some fun sneak peeks to share with you soon! I'm sure a few posts will trickle in here and there over the next few weeks, but they'll be irregular. We'll sure miss you but feel that taking a little time off from publishing posts will enable us to make some big steps forward with Style Mutt. We can hardly wait!

And not to be sidelined, we are so delighted to report that we also have our first design project together! When a super sweet, fun and spunky gal contacted us to help makeover her English basement, we knew a really exciting door was opening. Over the past few weeks the three of us have been brainstorming style aesthetics, design logistics, and are moving forward with tackling each element on the checklist. We will absolutely be sharing projects with you here and there and are looking forward to a full before / after reveal once the job is complete!

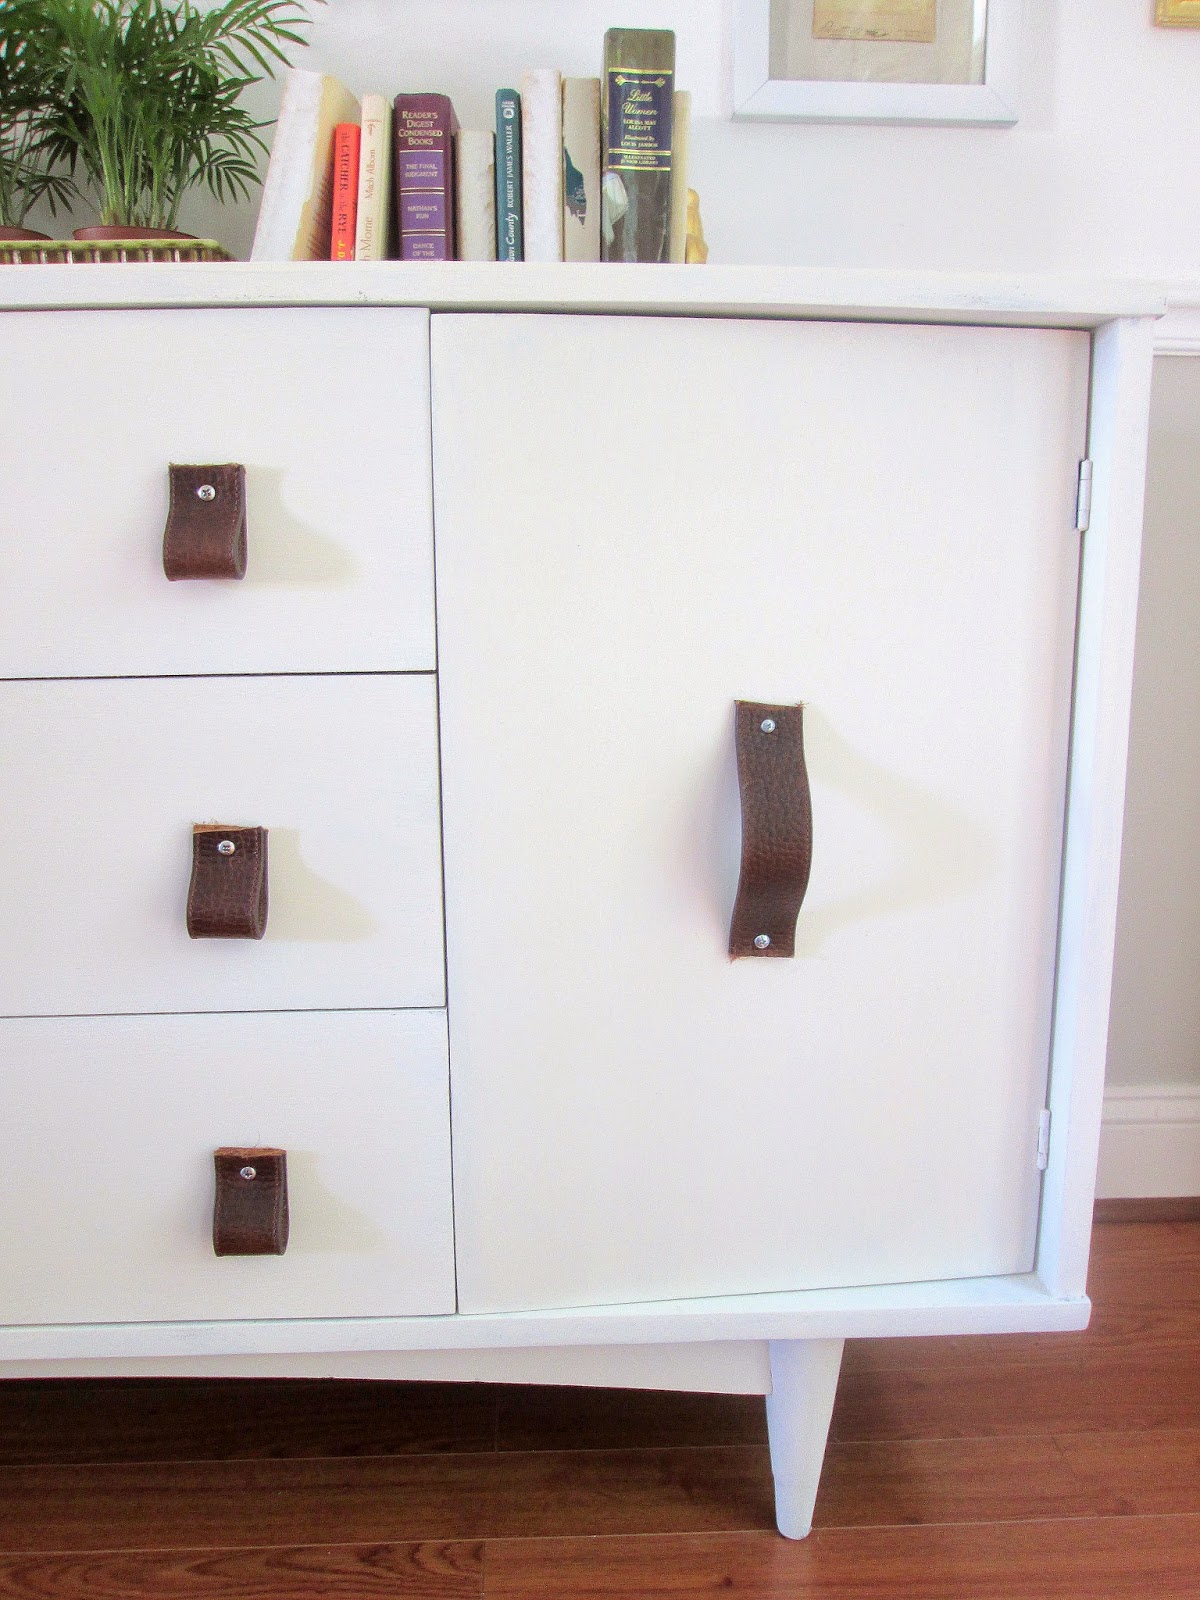
Cate and I feel that one of our strengths as a design team is finding chic, quality used pieces. We thrift, sure, but we have a particularly sharp eye for pieces that reach a standard of quality and style. For this English basement project we will certainly be doing a fair share of thrifting; looking for one of a kind, cool pieces that meet both the expectation of quality as well as style. These pieces may be found on Craigslist, at thrift stores, flea markets, and the like.

I've been wanting to share a little example of something that could be 'thrown together' using only second hand pieces. With just an hour yesterday afternoon, I scoured Craigslist, finding beautiful pieces at fair, secondhand prices, and created a hypothetical 'Craigslisted Living Room':


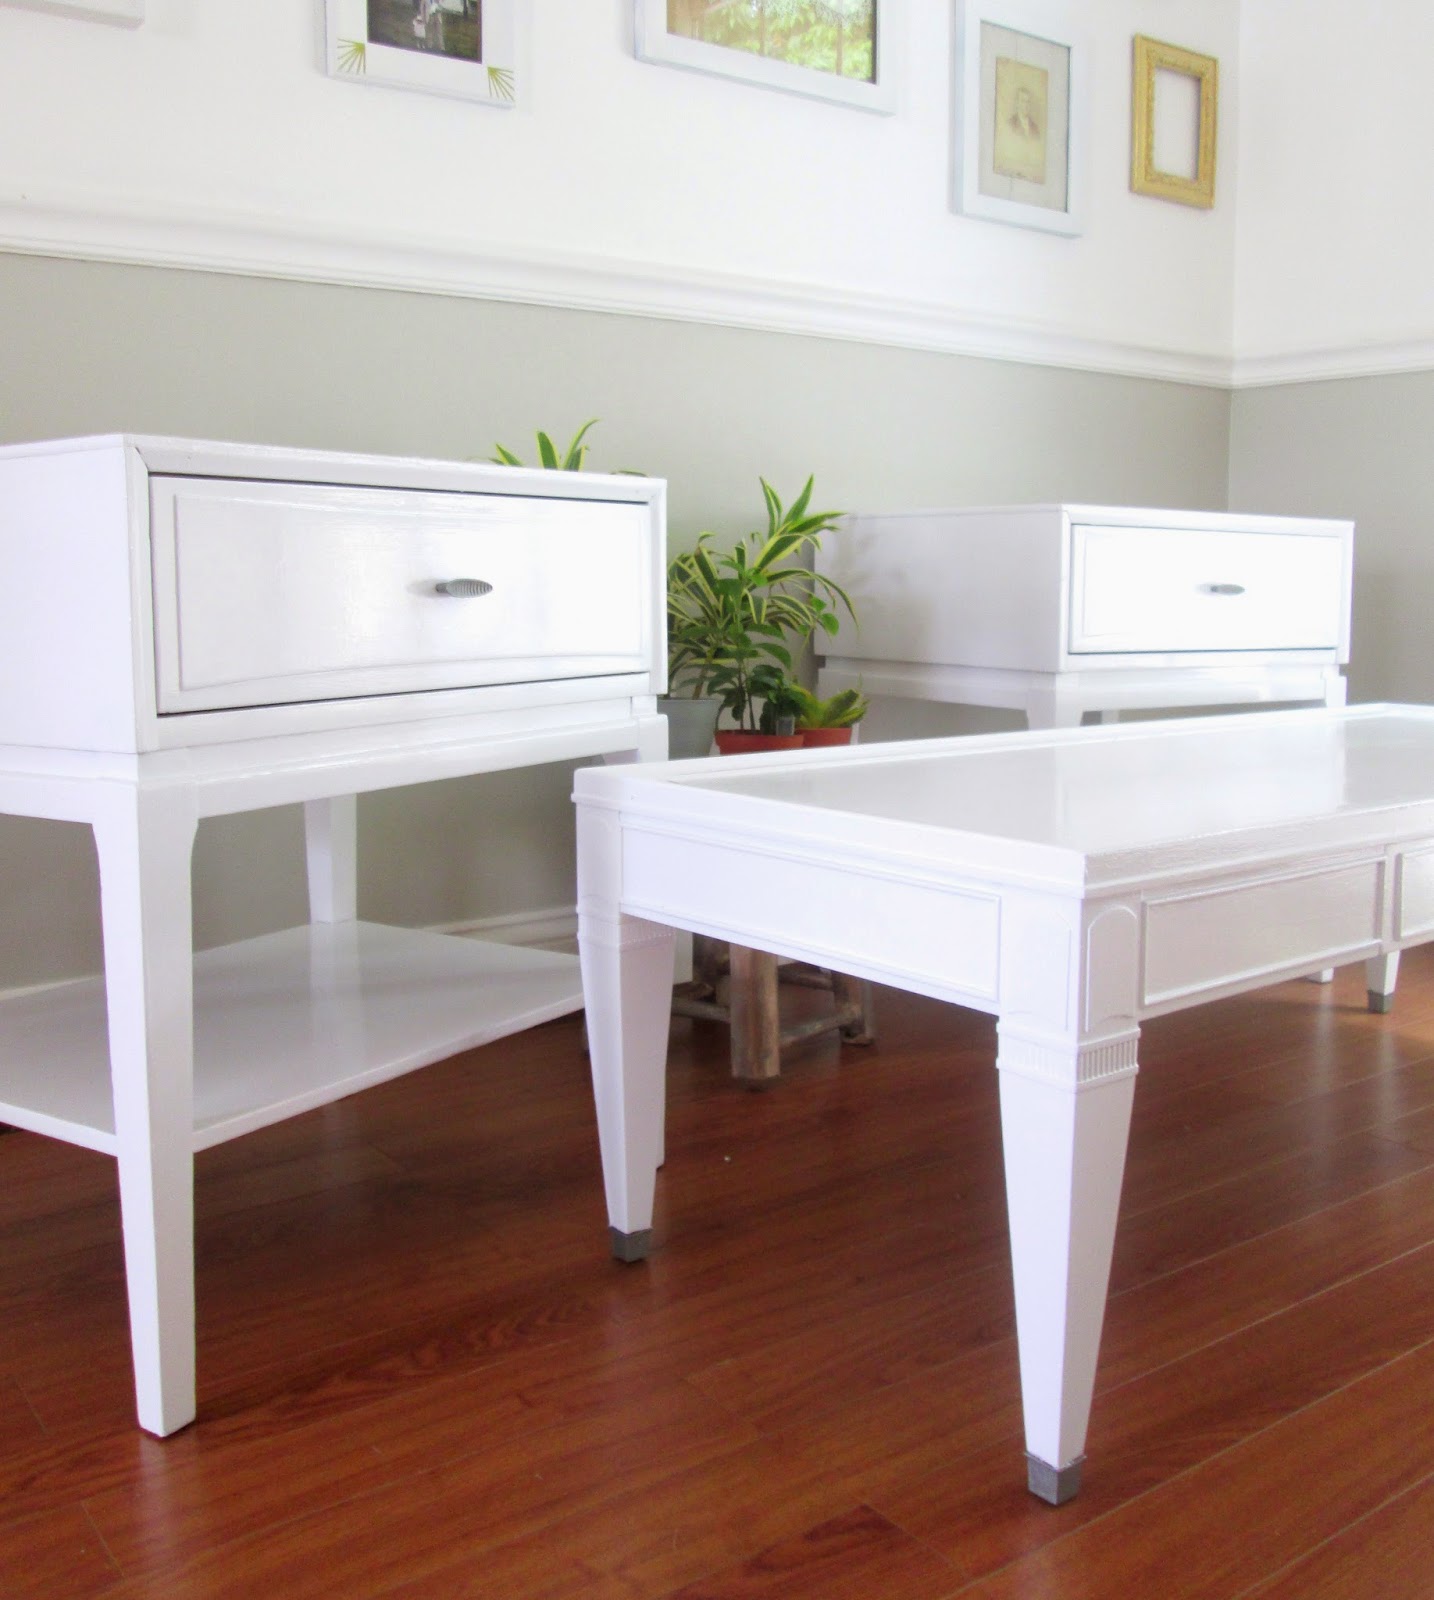
Okay, so I added a small handful of decorative knick-knacks, (including my favorite pillow by Cushion Cut Decor Here is a 1000% Craigslisted living room:


Pretty sweet, right?! Every single item above was currently available for sale, (by various sellers), in the Washington D.C. / Northern Virginia area as of yesterday afternoon. I didn't double anything that wasn't being sold as a pair, and only used photos listed in the ads. Obviously, it's always important to go and see a used piece in person, but I think it's worth giving secondhand a chance! 

So, that's what Cate and I will be up to over the next month! Between Style Mutt and this English basement, we are so excited about sharing some fun projects when we come back! Please continue reaching out in post comments, Facebook, or via email with any suggestions you have for Style Mutt. Your input and advice is imperative!  

Thank you for stopping by and we'll be back soon!

~Chelsea 

August 27, 2014

Hand Painted Globe & Stand

By Cate


As Chelsea told you, we cannot be more TICKLED to launch our new blog and resource site: Style Mutt. As we prepare for some big changes we will be working hard to give you something we hope you will love as much {if not more} than this site that started it all.  And don't shy away from telling us what you want to see on the new site!  We want Style Mutt to be a home for all design aesthetics, budgets, and skill levels so your unique input is invaluable to us.  {If you missed it, check out how your feedback can win you a special something from us in this post.}  But in the meantime, it'll be CG business as usual and since it's Wednesday, I'm coming at you with another guest post.

I'm so glad I showed you all the tour of my living room when I did because now it's 
buried under three new projects...


No.1: a handsome globe & stand
No.2: a bamboo-front dresser 
No.3: an old silver chest  

This epic thrifting score means get ready for some transformational debuts!

So how 'bout I kick us off with item No.1:

For such a handsome devil, the globe was actually an impulse buy.  In fact, he practically jumped into my cart at check out.  I think he thought if he didn't act fast, no one would ever take him home.  Lucky for him I scooped him up even though he had two obvious flaws that were dating his look.
The first was that shiny finish on the wood:
{See the Citristrip?  No secrets what I plan to do with the wood finish there.}
And the second was that old geography circa 1991 - can you spot it?
It was no wonder why he was at the thrift store in the first place, poor guy.

Ok.  So here's the real question - what do you do with an outdated and outmoded globe...
How bout turn it into a piece of art?


I gold leafed the continents and then hand painted over them in all sorts of colors.  I kept applying paint and washing some off, applying paint and washing some off to reveal the gold glimmer underneath.  I wanted each region to be an abstract blur like God's rainbowed creation: a beautiful mix of so much complicated individuality, ethnic diversity, and unique points of view.

Let's take it for a quick spin, shall we?
South America

North & Central America

Africa

Australia

Europe

Asia

And the last but not least: Antarctica 
{and the final continent remaining on my travel checklist}

And using my new Olloclip for taking iphone photos {alas I don't have a real camera these days but hey, rock what you got right?} I was able to get some macro shots of the paint effects so you can appreciate the detail.  Woot!


Shout-out to Caleb for surprising me with such a great gift #besthusbandever

Bonus alert: the ocean is a chalkboard paint!

As for the wood, I wanted to strip it naked and sand it to give it an un-finish like Chelsea's post about this dresser.  I wrestled with it for hours trying to get every spec of finish out of the nooks and crannies of the spindles.  In the end, I surrendered gracefully to the stubborn finish and decided I liked the distressed effect.  
 
Call it laziness, but I call it a mutual agreement.


Well mister, your dated days are over - now you are a piece of art!


Now available for sale
16"W x 16"D x 39"H
$125
Contact me at catherine.henifin@gmail.com if interested!

Happy Wednesday,

~Cate

August 26, 2014

Creamy paint + Distressed leather {Fall inspired}

By Chelsea


Hi guys! In case you missed it, please see yesterday's post and leave us some feedback to help us make StyleMutt simply amazing! There are 4 opportunities left to receive a special gift for commenting and we'd really, (reeeaaallllyyy), appreciate your input. 

So sorry, (not really), to bring it up again, but I've got to talk about the undeniable spark of inspiration that Fall brings. All over social media, television, and magazines in the newsstands, the fashionistas are hitting hard with all the upcoming trends for this Fall. Predictions seem to be heavy in soft, creamy knits paired with various shades of leather. Inspiring? Indeed! But why limit these delicious pairings to fashion?   

Such a cozy thought with an edgy twist must have a place in the home, too.


A piece like this works for almost any décor out there, and better yet, is an easy look to replicate!


This piece one start off so cozy but it sure was a tight ride bringing it home with the crew! 
(best crew around!)

Photo: This is the BEST thrifting crew in the biz, right here! One marvelous mid century piece is coming soon!


This transformation was relatively simple and required two supplies:

Old White Chalk Paint, (check here to find who stocks it closest to you or for ordering info), which I painted on in two solid coats, followed by a single layer of clear wax. I did not distress this piece, but rather left some areas along the sides and top surface a little thinner with the paint, (rather than full, complete coverage). This achieves a warm, weathered look without quite going all the way down to the wood. 


 And I used one leather belt to make drawer pulls.


To make drawer pulls out of a leather belt, you first need to figure out how long each pull must be based on the distance between your pre-existing holes, (if you don't want to fill those and drill new ones). The last time I did this, I had all the pulls horizontal and screwed in like handles, (piece painted in Chateau Grey mixed equal parts with Old White):


With today's piece I wanted to try something a little different and make tab pulls on the middle drawers. Don’t ever be afraid to get creative and test new ideas. If you don’t end up liking something, you can (almost) always switch it out; that’s the beauty of DIY projects! For this piece, I cut 6 x 6" strips of the leather belt, folded them in half, (matching the ends together), and used a drill with a larger bit to screw a hole into the leather. Then I used screws just slightly larger than the hole size and screwed the leather pulls right into the original holes. Finally, I secured the screws from behind the drawer fronts with the appropriate size nuts.


On the cabinet doors I used the pre-existing holes as well. I just measured what was left of the belt, cut it in half, and drilled the holes into the leather just like I did with the tab pulls. I wanted the leather straps to bow out a bit for easy gripping, so I made sure the length of the leather was a couple inches longer than the distance between the holes.


Piece now available for sale
58"L x 32.25"H x 19.25"D
$475
Please contact me if interested! chelseasgarage@gmail.com

I love transferring inspiration from all elements of design, (fashion, graphic, architectural, etc), into the home. It's completely possible to decorate how you dress, if you so desire! As I type this I'm looking down at my paint splattered leggings and baggy tank; it may be better for some not to decorate how they dress. ;) But on a serious note, if you’re not sure what your own style looks like yet, start looking around the web, in magazines, books, and even the world around you for home décor inspiration. Pinterest is a great starting point, and has lots of DIY inspiration for big and small projects. If you want to start small, photos are a great way to instantly freshen up your home. Resources like Shutterfly have fun options for printing and displaying a cute gallery wall, or just some simple wall art!

Tomorrow we get to hear from Cate and it's a good one, (as always)! Thank you so much for stopping by!

~Chelsea


August 25, 2014

Give feedback & Receive a gift!

By Chelsea


Hi friends! I hope you had a wonderful weekend. Though we are still in the 80s here in Northern Virginia, I can feel the distant nip of Fall coming. It's my favorite season, all full of color and coziness, (don't hate me, you perpetual summers out there). With two little dears starting preschool this Fall, the upcoming change of season is turning a new leaf for us whether we want to or not. Fortunately, our twins are both really excited, (which makes all the difference to me). All of you parents out there with kids starting school, (whether it's pre-K, leaving for college, or any year in between), I'm praying for you and your children; that it's a smooth transition into a new year, a smooth change of pace from summer, and for hearts full of hope looking at the school year ahead.

It feels so fitting to be turning a new chapter on the blog front as we approach a change of season. With Cate and I working on building our new site, Style Mutt, we are taking time to inspect all the areas of how we can be a top-notch resource in the DIY world. In order to cover the elements that are the most important to you, we would really appreciate your feedback!

Please leave a comment below and let us know what you would really like to see on Style Mutt. Or tell us what you've appreciated the most from Chelsea's Garage, or what you'd have liked to see more of.

The first nine to leave feedback will receive a special gift! I ordered an entire book of beautiful botanical color plates to frame and put around our home, share with friends, and give away as gifts. My little ones helped me choose 9 gorgeous, and varying pages for this special giveaway, (each color plate will fit an 8 x 10 frame). All you need to do is leave a comment with your feedback, your choice of color plate by number, (so before you leave a comment just check which numbers have been taken in previous comments), and email me at chelseasgarage@gmail.com with your mailing address! Your gift will arrive soon. :)


Thank you so much for helping us build Style Mutt! Your feedback is so necessary and valuable to us; can't wait to see what you have to say!

~Chelsea

August 22, 2014

Stunning White Lacquered Set

By Chelsea


First of all, I am totally not exaggerating when I say you guys made my day yesterday. Your response to The Announcement has been heartwarming. All of the enthusiastic words of encouragement just make this next step all the more exciting and Cate and I feel so blessed to be surrounded by such kindness and support. We cannot wait to get Style Mutt up and running for you!

Whew! Now onto some other business. How long has it been since I've painted something glossy?!? I can't even remember. With distressed, weathered furniture in high demand right now, I don't get a lot of custom orders for glossy these days. So when a seriously fun client told me she was thinking of doing a lacquered white set for her living room, my heart did a cartwheel! With her ideal dimensions, a photo of her living room, and general idea of what she was looking for, I finally collected three pieces that I thought would do her vision justice.

(Yea, can anyone in the Northern Virginia area recommend a driveway repaving company? We'll be in the market someday whenever we're ready to sell. Oh my...)


Seriously stunning, right?! And the smooth, shiny finish is just amazing. I mean, you could ice skate on the surfaces, that's how glassy they are. So, want to know the secret to painting a super shiny, glassy finish?


Sorry, I should have taken the picture before I cracked open the can. But it's this Glidden Trim, Door and Furniture paint! It's not with the rest of the paints at Home Depot - it was actually on the spray paint wall of all places. But this product is not joking around. It's thick as molasses, but as you're brushing it on, you'll start seeing the brush strokes settle into the smoothest surface you could imagine. And because it's so stinkin' thick, this stuff is tough as nails once it's dry. I actually, (totally by accident), bumped it a couple times when moving it around, and it didn't get a single scuff or scratch. Plus it wipes really easily making cleaning it off a cinch. The only issue I ran into is that it kind of ruined the two brushes I was using. It's literally like painting with a molasses-like glue. I've never had issues cleaning any brushes before, but this paint would. not. come. off. Even after an overnight soak in Dawn dish soap. And it's still all over my hands after several days and good hard scrubs. BUT, the look on furniture is such a dream it's worth a brush sacrifice, (or two). 

The second product, which I used to refresh the mismatched hardware, (which I had already removed when I took the BEFORE picture), is Rust-oleum Metallic Antique Nickel spray. I've mentioned this before, but Rust-oleum is the only spray paint I'll use. For some reason I get serious sputter issues and cloggy nozzles with other spray paints. Call it operator error, but I never have any trouble with Rust-Oleum, (which makes me feel like a big-time pro). 


A completely different feel from the lovely time-worn, aged and distressed pieces, but so very stunning and absolutely perfect for this set.

One of the elements of Style Mutt that Cate and I are looking forward to is having a favorite supplies and products page! I love talking products with you guys and enjoy sharing my recommendations when you contact me, but we want to make it even easier for you to find our go-to list of tools, supplies and products for all our DIYs, both big and small. We hope this guide makes it even easier to tackle your own projects at home!

Speaking of home projects, anyone working on anything this weekend? Tag #chelseasgarage on Instagram or share on Facebook! We'd love to see what you're up to!

Thanks for stopping by and enjoy your weekend!

~Chelsea


August 21, 2014

Change is in the air

By Chelsea


Hello dear friends, I'm writing today with a full and grateful heart. All of you even keel, non-feelers out there, be warned; it's about to get real!

Chelsea's Garage began on a wing and a prayer during the fall of 2009. I was spending long days living in Fairfax County Hospital while on monitored bed rest pregnant with our twins. During my time there I began researching how to refinish furniture, (among my other daily activities of crocheting, walking to the bathroom, and watching Ellen at 3). I saved a file full of the supplies I'd need, tools, and techniques; I really learned quite a lot before I ever picked up a paint brush. While the little babies played wrestle mania in my tummy, a little dream was stirring around in my mind.

The dream was tucked in my back pocket and stuffed with soiled spit up cloths and pacis while we survived our first year with twins in our apartment at the time. The funny thing is, I never felt anxious to get started. The Lord really gave me so much patience in waiting until the time was right. It's not in my nature to wait well and with a good attitude, so I am so grateful for that gift of patience during that time. God asked me to wait again when He surprised Matt and me with our third child, Mason, who was born right before the twins were 17 months. Before Mason's birth we had settled into our first home with not much more than our kids to our name.

It was after Mason was born that I jumped into the furniture refinishing / blogging world. I didn't know anything!!! I barely knew who I was as an artist, a designer, and much less, a creative business owner. But what I had without question was passion for inspiration and creativity. Over the last few years of publishing posts, (today's is the 400th!), on creative DIYs, refinished furniture pieces, and home decor ideas, I have learned more than I could ever have imagined, and the passion has only grown stronger.

About a year ago, Cate, (my talented sister-in-law who has been guest posting every Wednesday), and I started talking about building a business together. We've collaborated ideas, discussed goals and mission, and have a very clear direction with which we would like to move forward. Our aim is simple: to provide a top-notch resource site that is chalk full of information and inspiration for all styles. We want to provide not only imaginative DIY ideas, but where-to-find lists, how-to-make tutorials, and share more of what other creatives out there are doing as well! We want to offer a one-stop source that promotes sharing information and tips, tricks and techniques, and supports a positive, encouraging community among it's readers.

Although the content will be similar to what you've seen on Chelsea's Garage, (we will both continue refinishing furniture, flipping great deals, and sharing imaginative ideas), I've decided after much prayer and thought, that it's time to move forward with something completely fresh and retire Chelsea's Garage.

We are so very excited about this adventure but we know it will be a lonely ride without you all. We hope you will take this leap with us as we become something new; as we transition to 
STYLE MUTT

Naming our new site Style Mutt came very naturally; we both feel that our own personal styles are an eclectic mix of this and that, and I endearingly likened this mix of styles to a style mutt over a year ago here on Chelsea's Garage! Our hope is to build a resource that is helpful, informative, and inspiring to all breeds of style.

We are working hard on creating a clear sense of Style Mutt's mission, and building the site ourselves, so we will likely be taking most of September off so our focus can be clear. This does not mean Chelsea's Garage will cease to exist by October. We don't know exactly how long the site will take us to build, and we will still be posting to Chelsea's Garage, (except for September), until Style Mutt is completely ready. During this time of transition we hope to continue working on refinishing furniture and are still accepting custom orders, so don't hesitate to contact us if you have something in mind! We'll be sure to keep you posted on all that is happening with Style Mutt and hope as this new beginning approaches, you'll be as excited about it as we are! 

Thank you so much for hanging with Chelsea's Garage all this time - your 'company' here has meant so much to me and I could never have imagined the countless blessings that would befall over me through this blog. I feel so much peace about closing this door as I completely trust that the new door opening is so incredibly worth it. And I know you'll all be right there when this new door opens. You have to be; we need you!

Thank you, as always, for stopping by!

~Chelsea

P.S. You guys rock.

August 18, 2014

DIY - Rustic Rope Footstool

By Chelsea


Hi friends! I'm back with another DIY project today that I really enjoyed seeing come together. There are many reasons to take a project on yourself versus buy new or hire someone to do for you. Sometimes budget is the driving force to DIY, sometimes it's an itch for creativity, and sometimes it's simply seeing something inspiring and wanting to make it your own. Inspiration was the reason behind today's project!

Long story short, I noticed a particular footstool at my parents' beautiful home while visiting for dinner the other week with my family. It's quite a simple stool, but the rustic effect it had in their living room really caught my eye. I love seeing natural elements mixed into home decor, and this particular footstool is such a perfect example of something small that creates that natural bit of warmth.

I couldn't help but snap a photo:

And after a little fun, here's mine:


Want to see what it started as?


Not a bad deal, eh?! Let me show you how!

Supplies needed: 
Stool, preferably unpainted
Rope
Hot glue gun
Electric saw, (I used a circular saw)
Sandpaper, (120 grit)
Stain, (I used Ash)
White paint
(To note: I only included the price of the stool, $5, and the price of the rope, $8, in the overall cost of this project, since the rest of the supplies are either common household items, (hot glue gun, sandpaper), optional, (stain and white paint), or easy to borrow, (the saw).

The Low-down

1. Measure each leg accurately, (I used 9" from the seat), and mark where you want to make your cuts, then cut. Be sure to sand the legs at the cuts so they're smooth. 120 grit sandpaper would be ideal.


 At this point, because my legs were painted, I had to remove the paint. If I wanted to remove every bit of it I would have used Citistrip, but because I was going for a salvaged look, I just sanded it off and left bits of the paint here and there.

2. Stain the legs using a clean cloth or staining sponge


3. Dry brush a bit of white paint on the legs once the stain is dry, (which should only take a few minutes). Dry brushing gives a lovely, multi-dimensional effect to a piece so it isn't so flat, but it takes a smidgen of practice. First, I set the can of paint aside and use just the lid. Dab the brush into the paint collected on the lid.


Then wipe it off on a clean cloth, and brush quickly over your surface back and forth with the grain of the wood.


4. Now it's time to rope your seat. Start in the very middle, (best to measure so it's accurate), and stick a big glob of hot glue in that spot. Place the rope firmly into the glue and start gluing around a few inches at a time, followed by placing the rope over the glue. The middle is the toughest spot to get started, but once you get a few rows in, it gets much easier to handle the glue and the rope.


Finished product!


That's it! This stool would make an adorable child's step stool, plant base, or use it just as a footstool! You decide, that's the best part. I actually have a second one of these which I plan to refinish a little differently. Stay tuned! If you try this or any other projects you've found inspiring on Chelsea's Garage please tag them as #chelseasgarage on Instagram or share on Facebook. We love seeing your handiwork! In fact, check out this Swiss Cross rug, (inspired from this post), that a dear reader, Beth, made for her classroom:


So awesome! Thank you so much for sharing on Facebook, Beth - it's perfect in your room. Best of luck in the new school year!

Thank you all for stopping by!

~Chelsea