Inspiration Source: Land of Nod
I sketched some ideas and took some measurements and started by spray painting the glass gold in my makeshift spray tent/ bin. Painting the chandelier glass really brought out beveled angles and played up the geometric design.
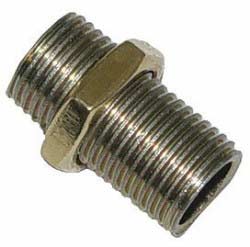
Next on the agenda was a trip to Home Depot to buy my supplies. My shopping list consisted of 3 items: 8ft lamp cord, a socket kit, and a threaded steel nipple smaller than the base hole diameter with a hex nut. I've included a close up of the threaded steel nipple since it's so small in picture {and so you know I'm not talking about something gross}.
Start by unscrewing the hex nut from the threaded nipple and slide the split end of the lamp cord through it. Then thread the cord through the base {since the chandelier already came with a convenient hole at the top this part was easy}. Then I followed the instructions to assemble electrical wiring of the lamp. Now I am not an electrician so I highly advise that you do your research before you begin and don't just take my word for it. If you need a tutorial, I found this one to be helpful and was able to follow along/ adapt where needed.

1. Disassemble the socket according to instructions
2. Screw the socket base onto the threaded nipple
3. Thread the cord through the nipple and the socket base and tie the two ends into a underwriters knot {the tutorial has a great illustration to help}
4. One of the cords ends is called the hot {smooth} wire and the other the neutral {ribbed} wire. Wrap the hot wire around the loosened brass screw on the socket and the neutral wire around the steel screw on the socket and tighten the screws until the wires are secure
5. Place the brass cover back over the socket top
6. Gently pull the cord taught until the socket top can snap into place on the bottom of the socket
7. Pull the cord through the base to get the socket in place
8. The socket should sit flush on the base with the cord hanging through the threaded nipple and dangling down inside the center of the base.
9. This last step is a little tricky to explain: turn the base over and look inside to where the bottom of the threaded nipple is sticking through the hole at the top of the base. Slide the hex nut up the cord to the threaded nipple and screw back on. Tighten the hex nut until it secures the socket to the base.
WHEW. That was a lot of electrical jargon. Hope you could follow along with me there. Let's move along so we can get to the reveal.
I was originally hoping for a tall drum shade, but when I saw this hexagon shade at Target, I thought can it get any better than this?
The gold base looks so glamorous.
I am so excited with how it turned out. And for a LOT less than the inspiration's sticker price of $79! Hope this will inspire an affordable copycat of your own.
Happy Wednesday,
~ Cate


Brilliant! I'd like one too, please, (after Mason graduates from high school). And some gold office supplies. ;)
ReplyDeleteI love this! I am about to transform a super large one with a few broken panels into a sort of terrarium. haven't decided if I want to shatter out all the glass (other than the area soil will go) and use the frame as a trelllis, Color block it gold & white... or leave some glass... - I am loving this gold exterior you did! I think I may do that now.. Thanks for sharing this!
ReplyDeleteThat sounds awesome! Please share the finished project - would love to see!
DeleteWhat brand of paint and what paint color did you use?
ReplyDeleteHi Jen - after some extensive research I found this article: http://www.brightgreendoor.com/the-gold-spray-paint-test/ which proved to be very helpful in my selection. I chose Rust-Oleum Metallic Gold because it had a yellower/ brassier finish than the other options tested in the article. Hope that helps!
DeleteHi Cate,
ReplyDeleteI was wondering how you got the cord through on the bottom. Does the base just sit on the cord? Is it lopsided? Did you cut a notch in somewhere?
Thanks!
Camille
Hi Camile,
DeleteI didn't cut a hole (mainly because I didn't have the proper tools) so one side of the base does side on the cord. But sInce the cord is flat and not round I hardly notice the lopsidedness. However, there was a great suggestion on apartment therapy to stick small rubber bumpers on the six points of the base to allow enough clearance for the cord to come under which I think I might try. Hope that helps!
So cute. Very pretty and such a clever idea.
ReplyDeleteSuch kind words! Thank you!
Delete