
By Chelsea


When we turned it over we got a surprise, (typical)! That scalloped trim was glued on!

We removed it by tapping a flathead screwdriver into the 'seam' that the glue created, and prying the trim off piece by piece.


Almost finished! The last thing to do was sand the legs to remove the stain.


Hi All! Today's makeover might not be brand new if you followed the process on Instagram or Facebook, but I've really been looking forward to debuting it here and sharing all the juicy how-to details. I am SURE you've all seen this dresser at some point in time:
BEFORE
It's a very common, run-of-the-mill piece. I've refinished a couple exactly like it over the last few years and I didn't really have any interest in doing another, (unless someone brought it as a custom order). I passed it at the thrift store three times before I started to see it as something different. Something fresh. Immediately, in my mind, I removed the scalloped trim on the bottom and saw the piece completely sanded with beautiful bleached wood underneath. All of a sudden I couldn't wait to get this gem home!
Since I was working on another piece at the time, this one had to wait a bit. In that time I received an email from a super kind ScotchBlue representative who had seen this rug and wanted to see more! She generously sent me a couple samples of ScotchBlue Multi-Surface Painter's Tape with the challenge to use them creatively. I really wanted to use the tape in a new way. That's when it occurred to me that painters tape is always used to get straight, accurate lines and edges. So I began to think outside the straight lines and came up with a fresh way to use ScotchBlue tape! This idea was just the perfect touch to add to the dresser.
AFTER
Quite the makeover, right?!? So let's get on with all the deets!
First, I used 60 grit sandpaper in my electric sander and removed all the stain from the body and drawers of this piece. I didn't bother with the scalloped bottom since my plan was to remove that part.
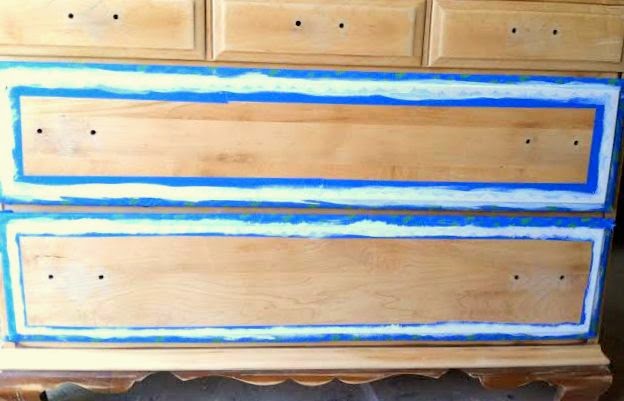
Then I had some fun with one of my samples of ScotchBlue Painter's Tape for Multi-Surfaces and a box cutter!
I used the box cutter to carve a scallop into the roll of tape. The scallop peeled off beautifully!
The bottom drawer shows my first attempt at creating a scalloped edge with the tape. I cut it too thin, so when I started carving the scallop for the second drawer, I just made sure to carve a thicker strip. This made the painting in the next step much easier!
I placed straight edge strips of the tape about a half inch to an inch outside of the scalloped edge and dabbed a thick artists brush into my paint and carefully brushed between the two pieces of tape.
It worked like a charm! I wasn't sure that the tiny 'points' of each little scallop would stay put, but ScotchBlue stepped up to the challenge. The tape, even at the sharpest of points, stayed put, and when I peeled the it off I had exactly the scalloped trim that I'd imagined!! If you refinish furniture regularly, you know that after a while you start discover it's best not to have an exact, precise plan when tackling a new piece. There's a lot that is unknown about a piece until you really start handling it, and sometimes you may change your mind about the overall look after you get started. This is all well and good; I'm a fly-by-the-seat-of-my-pants kind of girl anyways. But, it's awesome to have a tool like ScotchBlue Painter's Tape that won't present any surprises. You'll get exactly what you plan. It's just nice to have precise when you want precise, you know?
Moving on. Once the sanding was done, the trim was done, and I added some cute sisal rope pulls, (I just used the existing hardware holes to stick the ends of the rope in and secured it inside and out with knots), Matt helped me turn the dresser over on it's side. This was the gamble. I wanted that scalloped edge on the bottom gone, but wasn't exactly 100% sure how that would be accomplished. I assumed we would use the reciprocating saw to just cut it off.
When we turned it over we got a surprise, (typical)! That scalloped trim was glued on!
We removed it by tapping a flathead screwdriver into the 'seam' that the glue created, and prying the trim off piece by piece.
Almost finished! The last thing to do was sand the legs to remove the stain.
All said and done!
Now available for sale.
42"W x 34"H x 18"D
$410
Email chelseasgarage@gmail.com if interested!
Working on your own project using ScotchBlue painters tape? Submit photos to ScotchBlue by July 15 for a chance to win $5,000 to put toward a home makeover!
Thank you for stopping by!
~Chelsea
No comments:
Post a Comment